After a slew of not so happy DIY chalk-like paint finish recipes…
#1 {Two-Tone with a Twist} = too runny
#2 {Old Pickup Blue Dresser} = too clumpy….Really. This recipe hardened as you worked with it flaking little balls of plaster everywhere!
…I’m on to recipe number 3.
DIY Baking Soda Chalky Finish Paint
1/2 cup baking soda
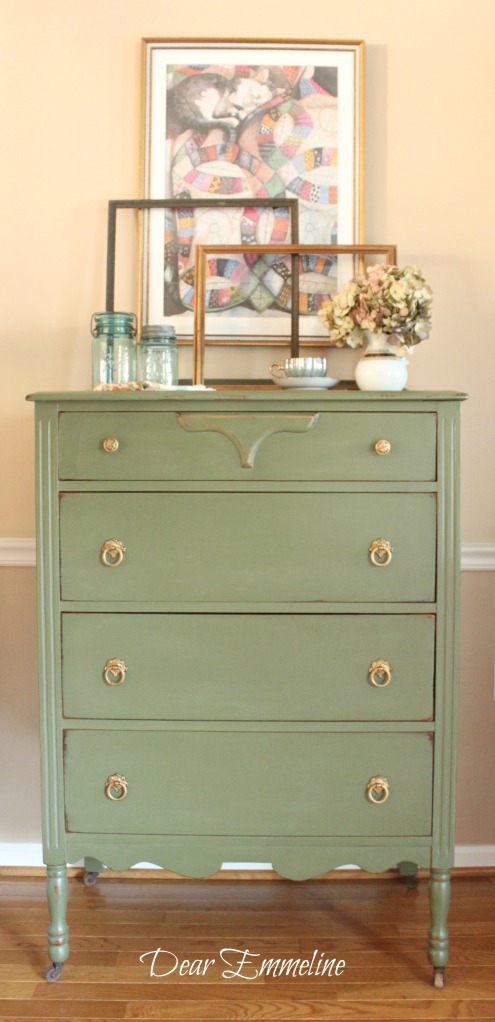
1 cup flat paint (I used MyColor Paint in Capulet Olive )
Stir the two together, and paint it all around, that’s what I’m all about! Whoo.
The Verdict:
Pros- painted on well (we used 2 coats), amazing stick power, sanded down nicely with a bit of elbow grease
Cons- fairly regular dry time (we waited overnight between coats), must give entire piece a light sanding to knock back sandpapery texture
Outcome:
Highly satisfied!
Even though you need to sand the entire piece after painting I really, really like this recipe! It is very economical to make and you just might already have the ingredients on hand. Top the piece off with three coats Minwax Wipe On Poly and the finish ends up looking amazing. The Wipe On Poly glides on evenly with no streaking or smearing and It also didn’t thin or pull up any of the paint!

We’ve hit the jackpot on vintage dresser recently and snapped up this one with original wood casters for a mere $40.00! It was missing the decorative back piece so my husband created a template and cut, sanded, and attached one!
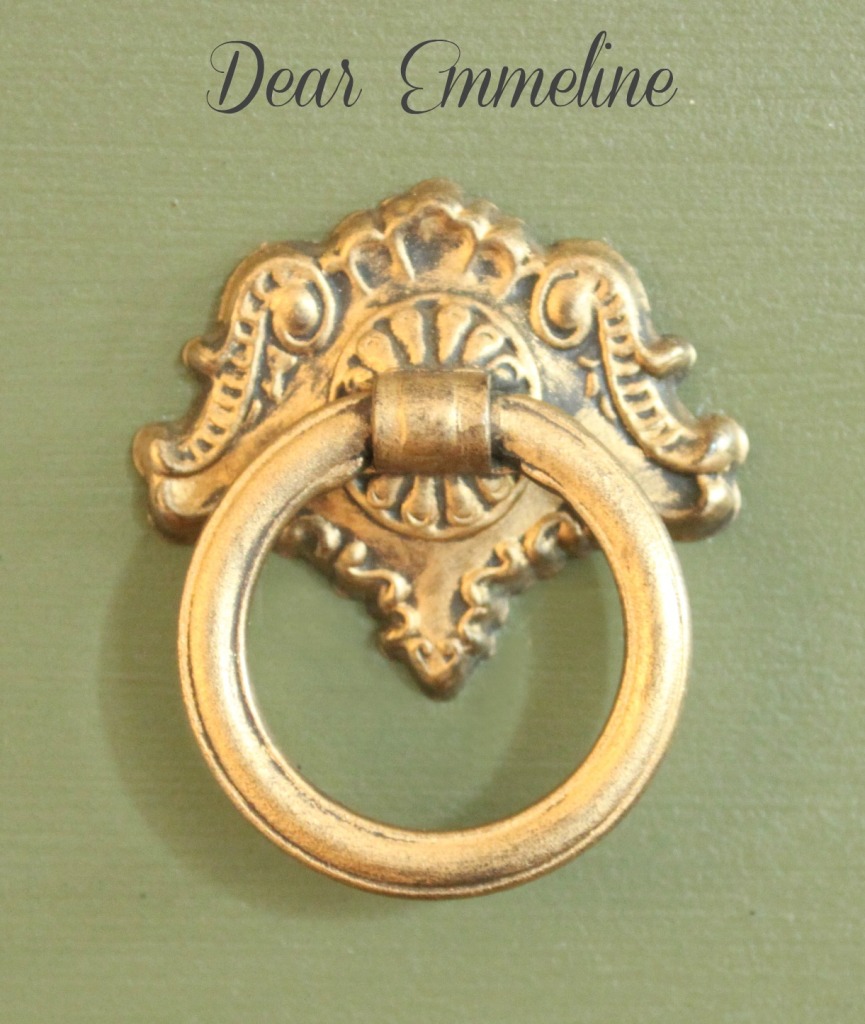
The original hardware also got a makeover courtesy of Gold Leaf Rub’n Buff. Love that stuff! It really does give a metallic finish that can not be achieved with paint.

So many painted pieces lean towards the feminine side. I was hoping this one would break that mold. I’d love to hear your thoughts!
**update** I found this DIY Baking Soda Paint vs. ASCP post over at eleven-o-one which does a really good job of comparing DIY chalky paint finish options specifically giving her opinions on Baking Soda Paint. We used the same ratio of paint to powder on our projects with similar results and Fran includes pictures of her project before and after sanding the paint finish. She also includes some great tips on storing this paint and what types of pieces it may not be the best for! I encourage you to go and read her post.
Oooh, love the color and those pulls. I have gilding wax, but everyone is talking about rub and buff lately. I need to get some!
Just beautiful. I found you via Miss Mustard Seed's FFF. I have tried my own chalk paint recipe using the plaster of paris instead of baking soda. Will have to try the soda next time. I love the chalk paint texture and can't get it in Australia, so have to make my own. But loving it! Hope you can check out my blog sometime. I posted right after you on FFF (#79). Bless you, Sharon.
A really pretty dresser in a great color! And the hardware looks amazing! I haven't tried the baking soda recipe yet.
Baking soda you say ::strokes chin:: will definitely have to give this a try!
I'm loving the color. I think my husband would put his things in it, provided it didn't have a doily on top.
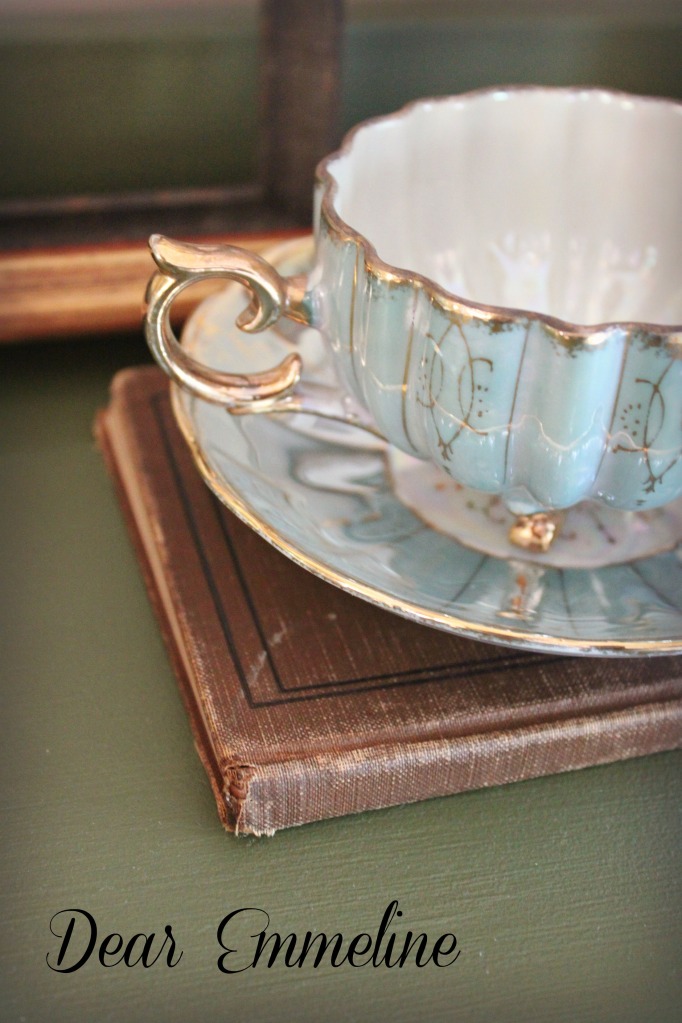
Love love that color! I also love that little tea cup/plate, all the colors are beautiful!
Wow – what a beauty! Love the colour, and very interested in the baking soda recipe, I might just have to give it a try!
This is beautiful! LOVE the color. Found you at Miss Mustard Seed and am following. Great job!
ooh so pretty! love the color and love the gold! but with its shape and added gold glam, i still think it's pretty vs handsome. 😉 but i love it!
What a great piece, I love the green! I just bought some rub n buff recently and love it as well 🙂
LOVE LOVE LOVE the color!! What paint color is that? Please share!!
I love that and I am trying that recipe for sure! Gorgeous – hardware if stunning! Love it all Jessica!
Stacey :o)
Thanks so much Sharon! Hopped over to your blog. Your work is lovely! What a great idea to upholster that coffee table. Looks great!
It's gorgeous!! and thanks for the tip about the baking soda chalk paint. I am going to try it. I already have the stuff I need on hand and already have a project in mind. Now just getting the time to do it is another story, lol.
sorry the PB body pillows were sold out! I just found your facebook page also…LOVE your work!! Will spend the weekend looking at all of your projects…chris
Love the color!! What is it? It's a beautiful sage.
LOVE this!! The hardware color is perfect with the olive. Love it!
I love this dresser! great job.
Oh my friend this dresser is gorgeous! the color is divine and the workmanship is outstanding!!!! A perfect piece!!!! I am going to try the baking soda for SURE!!!! thanks for the idea! : ) sending hugs and thanks for sharing at Junkin Joe…we LOVE having it shine at our party…it's awesome!!!!!!!!!!!!!! : )
Such a pretty paint colour. I had a piece almost identical to that but I gave it away before my blogging days.
Hi! I'm Ally from Homebyally.blogspot.com. LOVE this dresser! I am a military wife with a serious passion for all things pretty. I love to repurpose furniture, DIY projects and making any house a home no matter where it may be. So happy to have found your blog 🙂 Please come by and say hello! XOXO
-Ally
Looks amazing!! (Jess from http://www.theredheadedprincess.com) I think the decorative part makes the piece. But it also gives it a touch of femininity but not too girly. Very nice! I have a question though, do you have to sand in between coats when you paint furniture? And should you use flat paint or semi-gloss or does it matter in general?
This is beautiful! New follower (and i love your background–I want to make curtains out of it 😉
I do not sand in between coats. If I am distressing I do that after the piece is fully painted. With this DIY recipe after the two coats I lightly sanded the entire piece to smooth out the texture of the paint and then I sanded to distress the dges and drawer corners! When making your own chalk paint you should use flat paint (every recipe I've seen uses flat)! Hope that helps!
Will try this. Thanks for the tip. Your dresser turned out beautiful.
Beautiful new dresser. I too, use my own mixture of plaster of paris/paint or baking soda/paint. Which did you prefer?
I'm a new follower by the way. 🙂
As soon as I saw what you mixed to make the paint I clicked to follow your blog … I could tell you were my kinda girl! I just spent $65 buying a quart of chalk paint and a microscopic can of wax. I painted my bench out front. Took FOREVER with all the nooks and crannies and used most of the paint. Then I did the wax. It looked HORRIBLE. Everyone hated it, I was embarrassed the neighbors would see! So off to Home Depot, back with 2 cans of spray paint. Sure wish I would have visited HERE first… I would have saved myself a lot of money and time! Someday when I can talk about spending $65 on paint/wax and not cry I will have to blog about it… Great job on YOUR dresser, by the way! Gorgeous! xo jules
This looks great. I started using the recipe from Sharon at Elizabeth and company and I have to say the thing that kept it better was keeping it in an airtight container. I use Mason jars and it has worked great. That way too, I cna use the paint again on another project if I have mixed too much.
Thanks for stopping by and saying such sweet things!
Kim@reposhture.blogspot.com
Hi! I came over from SixSistersStuff and I've got to tell you that color really is gorgeous. I have always balked at using chalk paint because it's so much more expensive, but you've convinced me to try this DIY version. Also, I have used Valspar Antiquing Glaze on hardware, but I'm not sure how your buff compares. What do you think? Do you always use a wax for your distressing? how does that compare to the glaze? and do you poly over it?
Thanks so much Carissa! This is the first time I've used Rub'n Buff on the hardware (which is a metallic tinted wax). For the dresser I used wipe on poly to finish. I typically don't use any antiquing process (wax or glaze). I usually distress the paint with a sanding sponge and then seal with either clear wax or wipe on poly (not both). I've used dark wax once but don't really care for it and have never used a glaze! I don't typically care for the glazed/antiqued look beyond distressing unless the piece has some fancy woodwork or grooves that can be enhanged by darkening up the recessed areas!
This is totally beautiful! Love the color and the way you styled it! I have not tried a chalk paint recipe yet? I still use Annie Sloan. I would like to give one a try. Thanks for sharing! I am your newest "linky" follower! Life to the full, Melissa @ DaisyMaeBelle
Thanks for stopping by Melissa! This was the third DIY Chalk Paint recipe we've tried and I really like how it turned out. Eventually, I might try the unsanded grout recipe too! 🙂
It's gorgeous and I love the color!
Looks fabulous! Love the color and the hardware. I've made chalk paint with plaster of paris, but I might have to give your recipe a try 🙂
Beautiful! That color is perfect. <3
Sarah @ fancyco.blogspot.com
Such a beautiful piece! The color is awesome. I'm going to have to try out your recipe. Megan
Love it. Going to try out your recipe. I normally use the plaster of paris one. 🙂
Thanks so much Sarah!
Thanks. I branched out from the POP recipes because both I tried had major issues and I wasn't up for ad libbing my own recipe. Turns out my husband tried to make an in between batch of the 2 recipes I posted and it was an epic fail. We mixed up a batch of black and it dried a crusty dull gray and looked like a paint version of asphalt mixed with cement. One big mess! :/
That's a lovely makeover, I really like the colour and style – and what a great bargain!
I read this yesterday and instantly got started! Thank you soooo much!!
This is lovely. I have not seen DIY chalk paint recipes using Baking Soda. I must try this. Thanks for sharing.
This turned out SO cute!! Love the color you picked!!!! Great job!
I am beginning to think that chalk paint can be made out of any paint and anything powdery. Someone will probably try baby powder someday. Love the outcome on this dresser.
Hope it works for you! You'll have to share your project(s) when you finish!
Thanks! We picked up 2 antique dressers at the same yardsale for $40 each. We may have been high-fiving each other all the way home! 😉
TRY IT!!!! It might smell awesome! 😉
I think a sciency explanation (with no proof or official lingo) would be that the tiny particles of any of the added mediums (Baking Soda, unsanded grout, Plaster of Paris) fill in any grooves and space on the surface while adhering to and becoming a part of the paint…hence making it stick better and harder to pull off in big clumps like regular latex paint which sits on the surface!
Its beautiful! I will have to try this. I have used plaster of paris in the past, didn't like it one bit.
I am DYING to try some homemade chalk paint…and I believe your 'formula' is the one I will try. Now the waiting starts….till my sister comes to visit again…I've talked so much about doing this I know she'll want to be in on the fun!
Thanks for sharing!
This looks fantastic, love it. Thank you for sharing! -K
Beautiful color & great texture! Hope to try your paint recipe one day =) xo caroline @ c.w.frosting
I love your color choice! It turned out just gorgeous! I'll have to tryout your recipe for chalk paint. I use Plaster of Paris (mix it in warm water first) with flat paint. I've been happy with it. In the beginning I was mixing it right in the paint I had to deal with the little lumps! Thanks for sharing!
I have yet to try chalk paint – purchased or DIYed. I like this recipe because baking soda is so inexpensive. Thanks for sharing!
Can't wait to try this recipe. Your dresser looks divine and I will be featuring it at tomorrow's Shabbilicious Friday party. Thanks for linking up this week.
The title on the linky says baking powder…..but your recipe says baking soda. I think it is the soda, right. Amazing that it works like it does. I just stated using the Annie Sloa but will try this. Thanks.
whoops. It's baking soda! I knew I was going to end up screwing that up on at least one of the linkups!
I love the color of your dresser!!! And your hardware looks very expensive! Great tip about using Rub And Buff!!! Thanks for bringing your creativity to TUTORIALS TIPS AND TUTORIALS!
Thanks Yvonne. 🙂
So pretty! I am featuring it tomorrow on the blog. Thank you so much for linking up to The 36th AVENUE.
Thank you Desiree! I love your blog and am so honored to be featured there. 🙂
Super pretty! I love it! What a fun concept…baking soda! I'm featuring you on Saturday! XO, Aimee
Love it – absolutely gorgeous! Love the price you paid for the piece, love the color you used, and love the handles – perfect! Mary
I've got to try that recipe. Love the color. I'm featuring your dresser in the Power of Paint Party Spotlight this weekend. Thanks for linking up!
Thanks for the tip. I'd like to try it! Patsy from
HeARTworks and
papemelroti
Looks amazing! Beautiful color and thanks for sharing the recipe for the chalk paint! I'm so glad you joined Twirl & Take a Bow!
Leslie
I really appreciate hearing your first-hand experience with this chalk paint recipe–it was very helpful to me. I love how your dresser turned out, and the rub and buff on the metal pieces look wonderful–I'm going to try that sometime!
Good Morning Emmeline, I think the colour can be "either" "or". By that I mean my husband would love the colour and he would love the dresser He would definitely use it to put his "bits and pieces" on. Also I can also see it dressed with glass, silver and flowers. It's a beautiful piece. Thank you for sharing the recipe for chalk paint. Best Wishes Daphne
🙂 Thanks for stopping by Daphne!
Another one bites the dust…chalk paint dust that is. I'm a newbe at it too and I'm completly addicted. Love the color you guys chose.
I love it!!! 😉
How do you do the little corners to leave it free of paint like old furniture??
Thanks!
I just use a sanding block/sponge and sand the paint off where I want it distressed!
Oh my gosh, this piece of furniture is SO lovely!! And I love the rub-n-buffed hardware -thanks for linking it up to Bling It On! I will have to try your chalk paint recipe – I did not have great luck with unsanded grout/latex paint and would love to try this. The color you chose is really pretty too!
I haven't read thru the comments, but it seems like Baking Soda would be a lot LESS expensive than Grout or Plaster of Paris, so it seems worth a try. Especially with all the leftover paint I have laying around the house.
Thanks!
Shared your link on my FB Page too – https://www.facebook.com/TheSunflowerGalDesignTeam
Kisha
Love how your dresser turned out and love that color! Thanks for sharing another great project.
Linda at The French Hen's Nest
Hi There. The piece is abosolutely gorgeous. Can you tell me what color flat paint you used to mix with the baking soad to get this lovely green?
Hey Elizabeth! It's MyColor Paint's Capulet Olive.
http://mycolorpaints.com/products-page/product-category/capulet-olive/
I am so glad I found your blog! I bought a little stand for a couple bucks at a thrift store last year and have been considering trying to paint it with chalk paint. I went to Lowes yesterday and they had huge bags of unsanded grout for about $12 and I figured that I would go back and get that when I'm ready to paint. Then, I came across your blog. Baking soda? Wow! Lowes has the small sample size paints for only $3 and a box of baking soda is only about a dollar. I am so ready to try this! I have to reread the wax part as I don't know which one to get though.
Oh, and I love your dresser! I was wondering how a darker chalk paint would look and I think it looks great!
I sealed this piece with wipe on poly. you can buy it at the hardware store for about $11. I especially like it for the homemade chalk paint because I feel better that it soaks in and hardens the paint right to the surface. It is a liquid and rubs o like water!
This piece is beautiful. If I might add a fourth recipe, I used flat paint and non sanded grout. Did not have to sand in between and absolutely love the end result. I did a shelf and then a cedar chest so far and will be doing a coffee table next. I used minwax as my finish and love the soft look.
I haven't tried the grout or another option I've read about (calcium carbonate powder). I did need to lightly sand to knock back the texture of the baking soda. While these options are definitely cheaper I personally don't think the results are quite as foolproof as the real deal. 🙂
Emmeline—-
LOVE this piece and switched my color game plan for my roadside rescue little chest to your color, pull finish, etc… I even took a pic to the hardware store to try to match color. Happy so far and your recipe gives a nice finish, though much work remains (sanding the paint, the poly coats.) Excited and wanted to thank yoU!
Your dresser which happens to be my very favorite style is so incredible, love the color too. Not usually fond of olive but one you used is very soft and calming looking, did such great job on it. The hardware is gorgeous. Like that you didn't over distress it.
I am so glad I clicked on your post about the chalk paint recipe. I have made and used the un sanded grout chalk paint, worked ok I guess. I would love to try your recipe very soon on a chair gotten at thrift store. I keep lots of baking soda in stock for several uses around house.
Haven't ever purchased the commercially made chalk paint, that's way out of my budget. If I have to decide if we'll eat or I'll buy paint, well is there a question of which one?
Guess the calcium carbonate can be purchased thru Amazon, I'm too impatient, when I get urge to paint want to do it then, not after I have to go shopping or wait to get in mail or have to pay for s&h. Hey we live on SS, it only goes so far when there's 5 weeks between paydays and not to be spent on something I can sure live without.
I found you thru 141st. Power of Paint party, Domestically speaking. I took time to read comments as I usually learn a lot from them on post like this. Appreciate you sharing your chalk paint recipe and your experience using it. Most helpful for somebody learning how to redo pieces. Happy Fall. If you choose to reply please do so to email address.
No email address came up in your profile or when I reply via email:
Thanks for stopping in! I do love this olive color. The baking soda recipe is definitely an affordable option but it requires more effort than the real deal chalk paint. The biggest difference is the texture which you have to sand down between coats and before you seal.
You're quite welcome! This recipe definitely is more work than real chalk paint but it does still come out as a beautiful finish after sanding down the grit!
Dear Emmeline,
I just love your green dresser and I'm going to try this recepy.
I also love cats and quilts…Would you please tell me who the painter of your framed cat-on-quilt painting is?
Will follow you,
Yvette
Yvette,
Here's the link to the cat and quilt art print:https://www.etsy.com/listing/61571902/limited-edition-print-of-cat-and-quilt
Thanks for the paint recipe and tips! I tried this out on my bookshelf using dark red paint. I opted to keep the rough texture in order to give my shelf an “old barn” look and feel. I love it, especially after I topped the paint with a little antique wax. ☺
yay!!! so glad you liked the recipe!
Have you tried this recipe on fabric? Want to paint a couple of Wing chairs. I’ve read chalk paint works on fabric just not sure if this recipe will work. Just painted my first end table with your recipe working out well! Onto a complete bedroom set!
I’m so glad the recipe worked out for you. I’ve never tried it on fabric. A textile medium mixed with paint is probably your best bet for fabric. I know some people use chalk paint but I hear it gives the fabric a leathery feel.