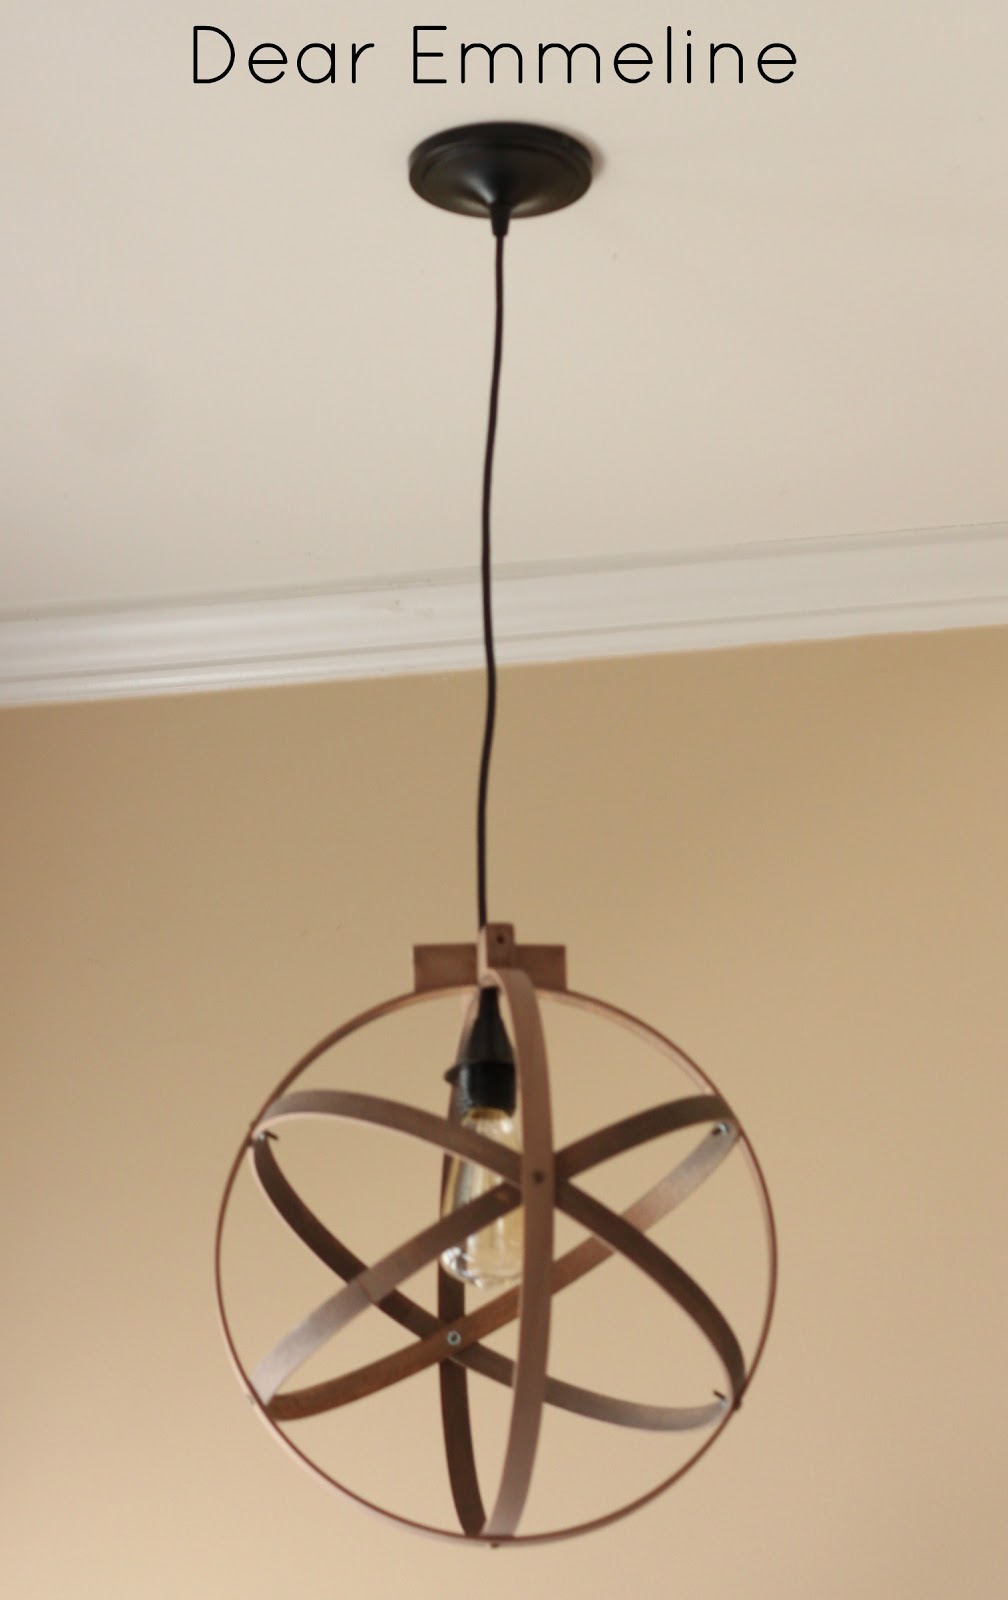
Ever get inspired by someone else’s work to create something similar yet so completely different?
When I saw View Along the Way’s Dodecahedron Pendant Light I fell in love but I also knew that not only did I not have the tools to recreate it but it would be a TON of work.
Then I had the thought, “Is there anything I could use to create a pendant with a similar feel with a lot less work?”
A thought sprang to mind, and here is the result!
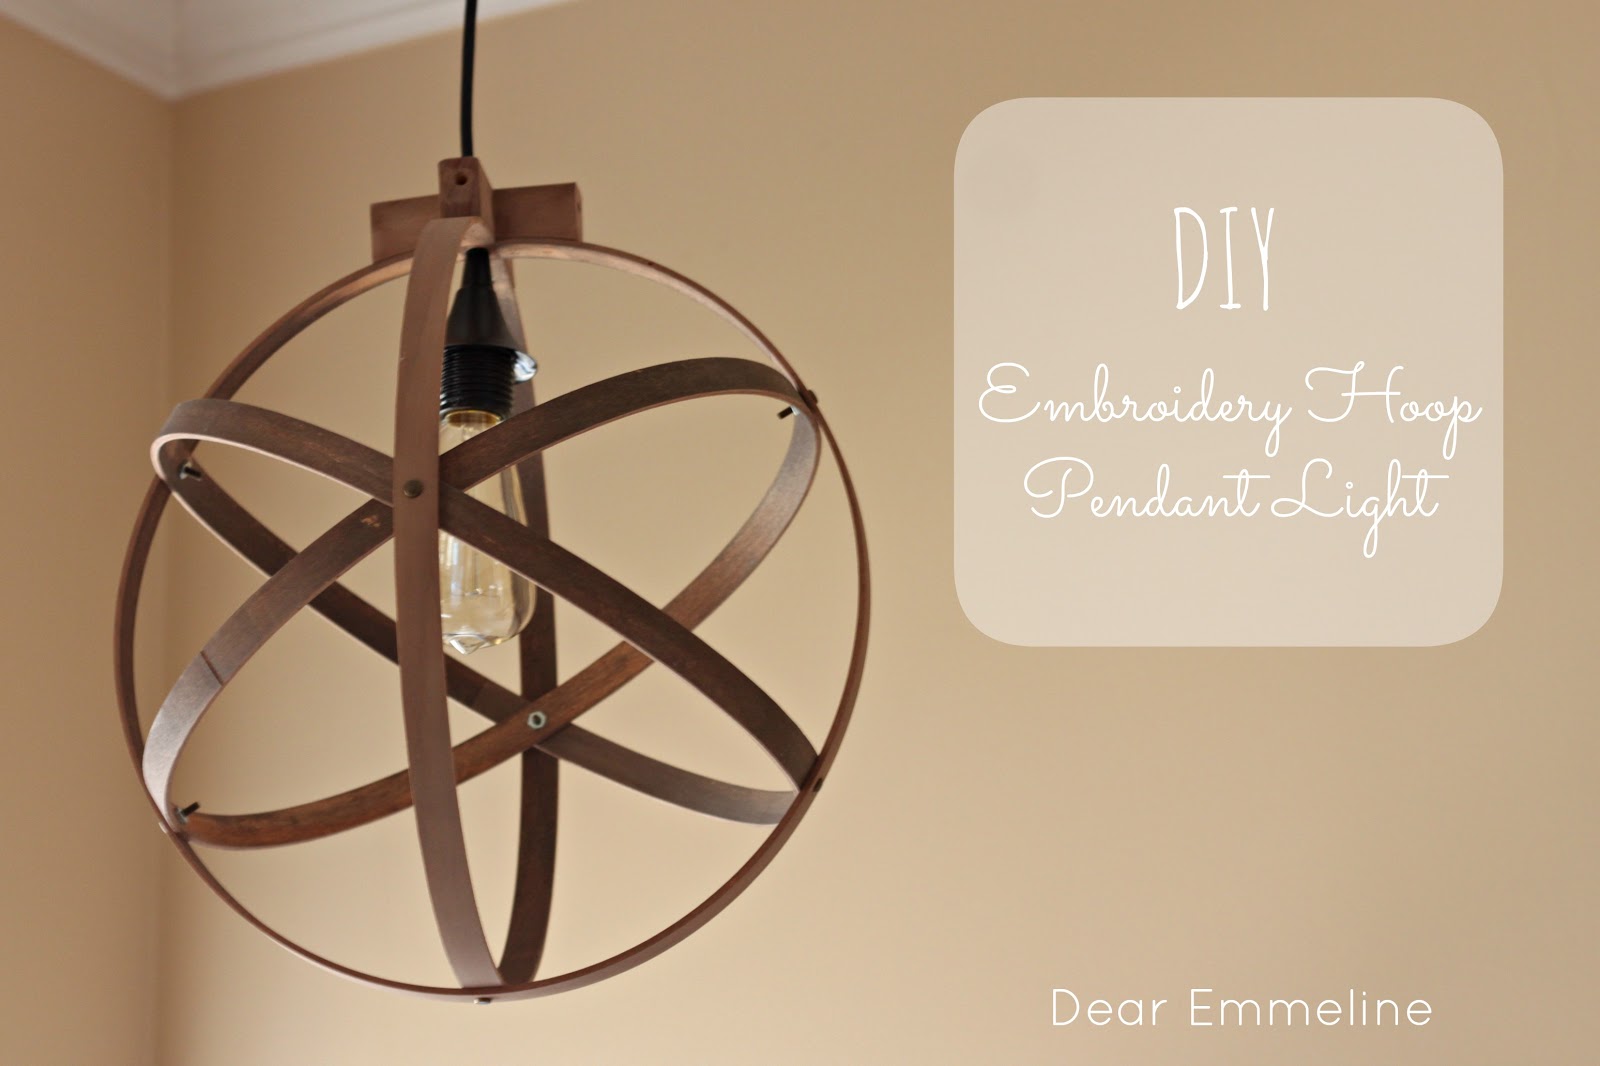
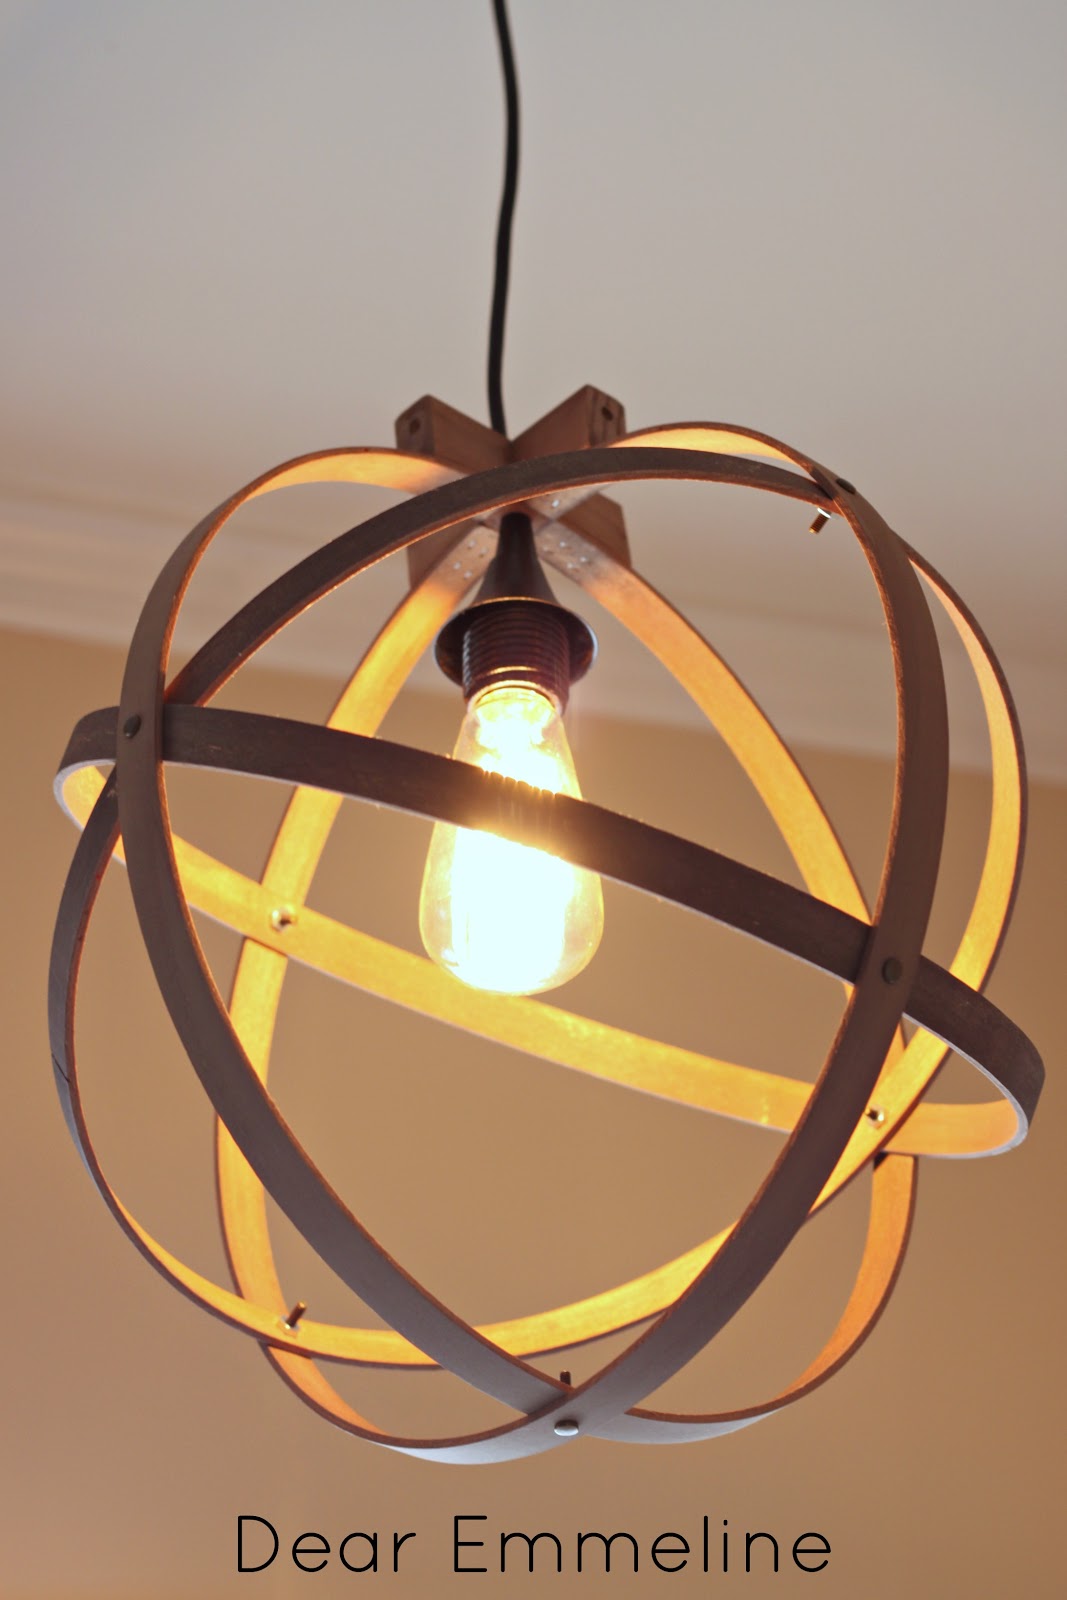
It took us about 30 minutes of actual work time to make this fixture!
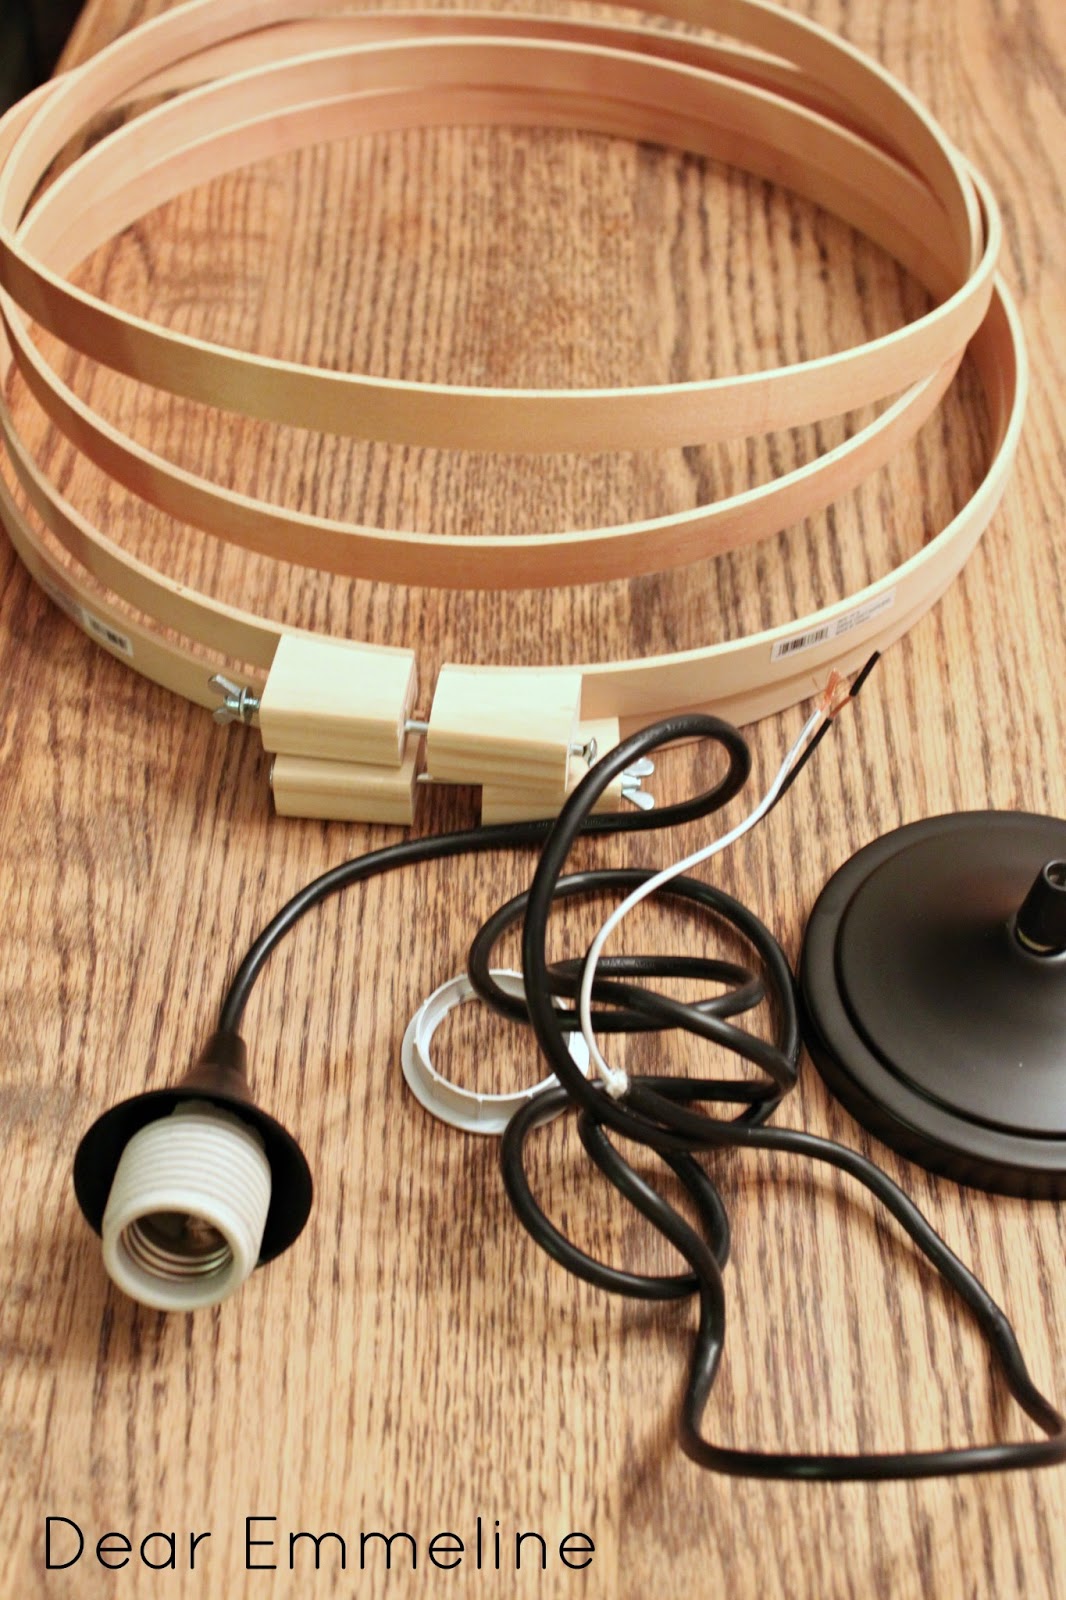
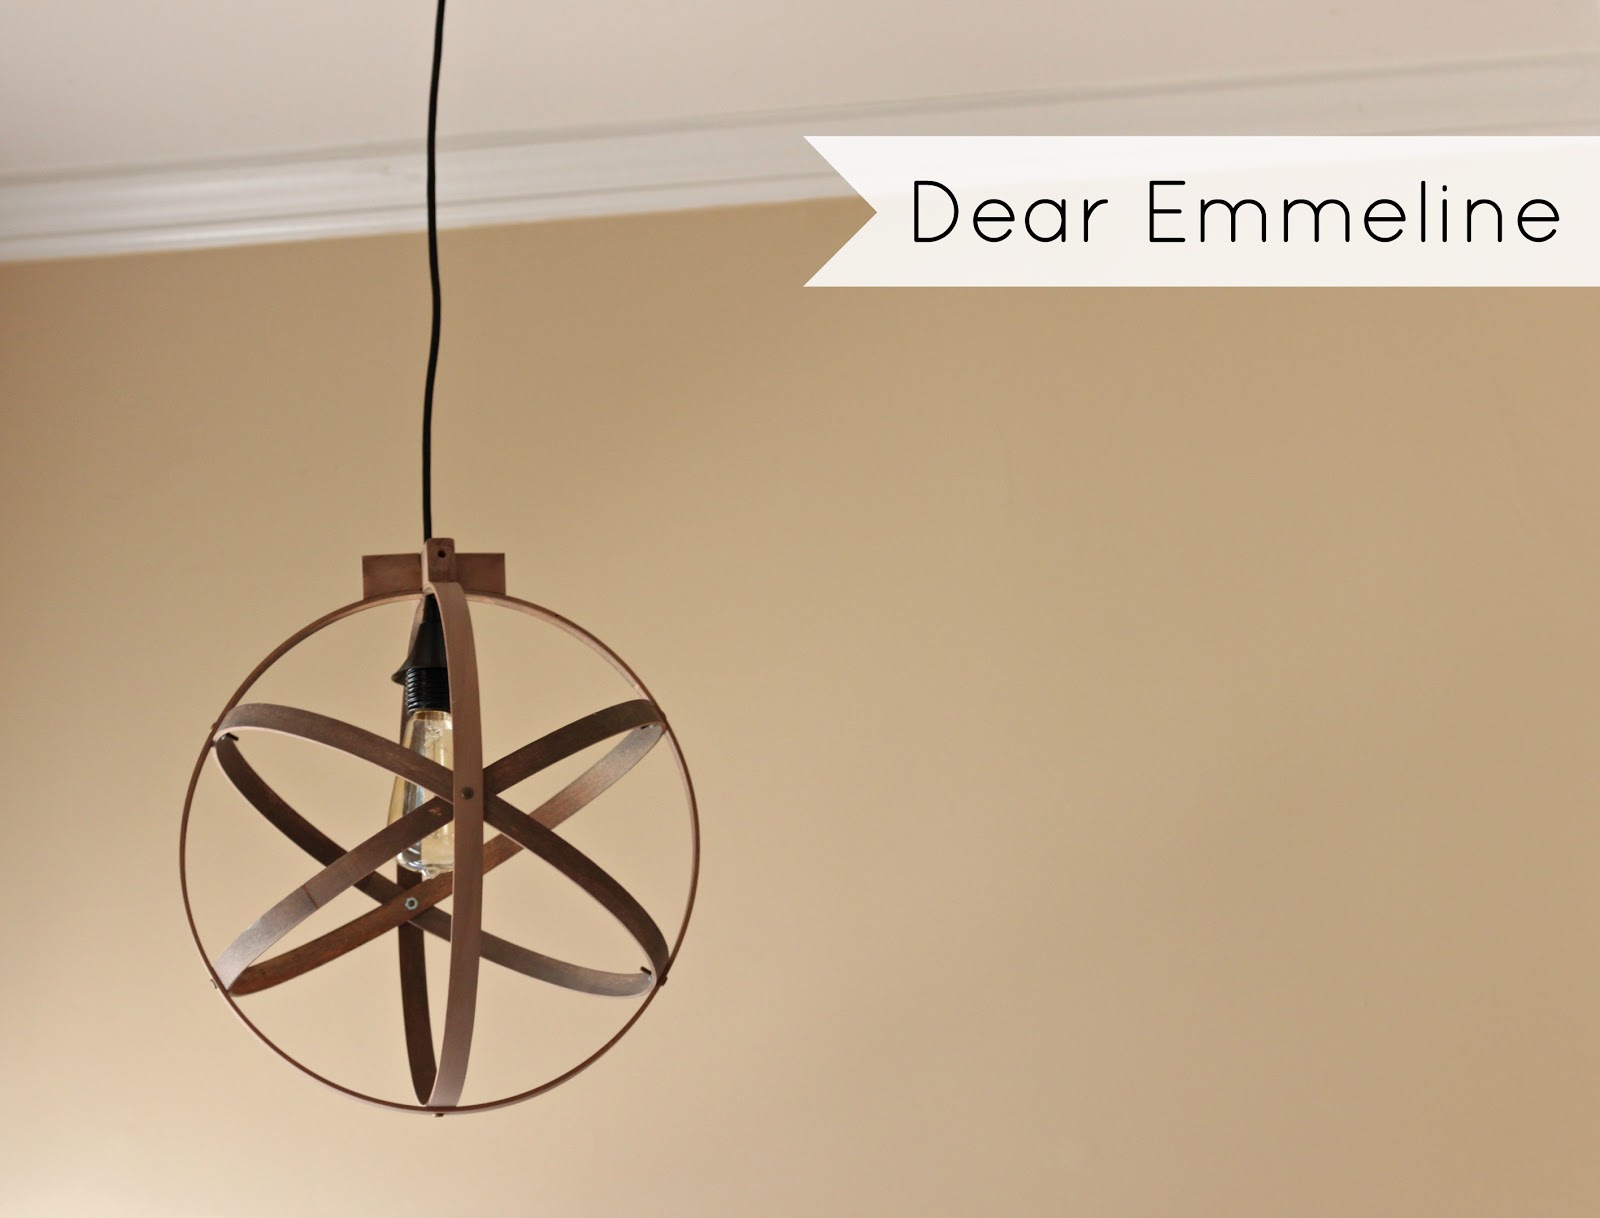
If you want to make your own here’s what you’ll need:
- 2, 14″ quilt hoops (we bought ours at Jo-ann Fabrics, original price $4.99 each)
- stain or paint
- 3/4″ square dowel
- pendant light kit
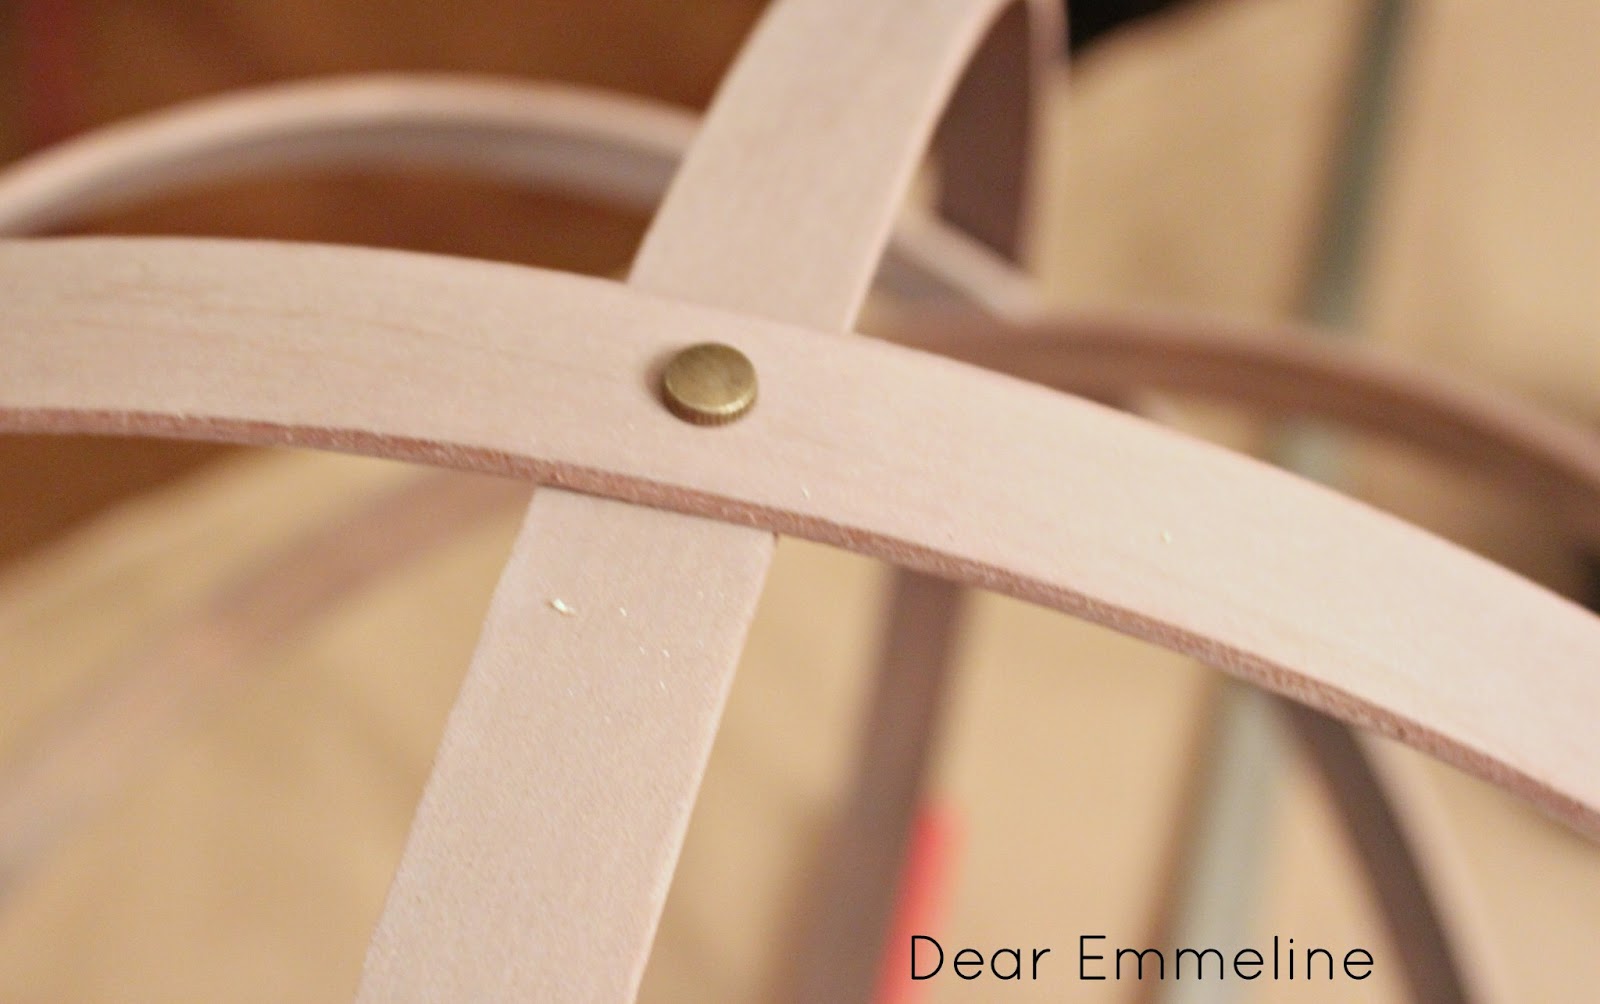
- 7, 8-32 x 3/4 flat head Hillman knurled screws
- 7, 8-32 hex nuts
- drill
- wood glue
- clamps
- spray paint
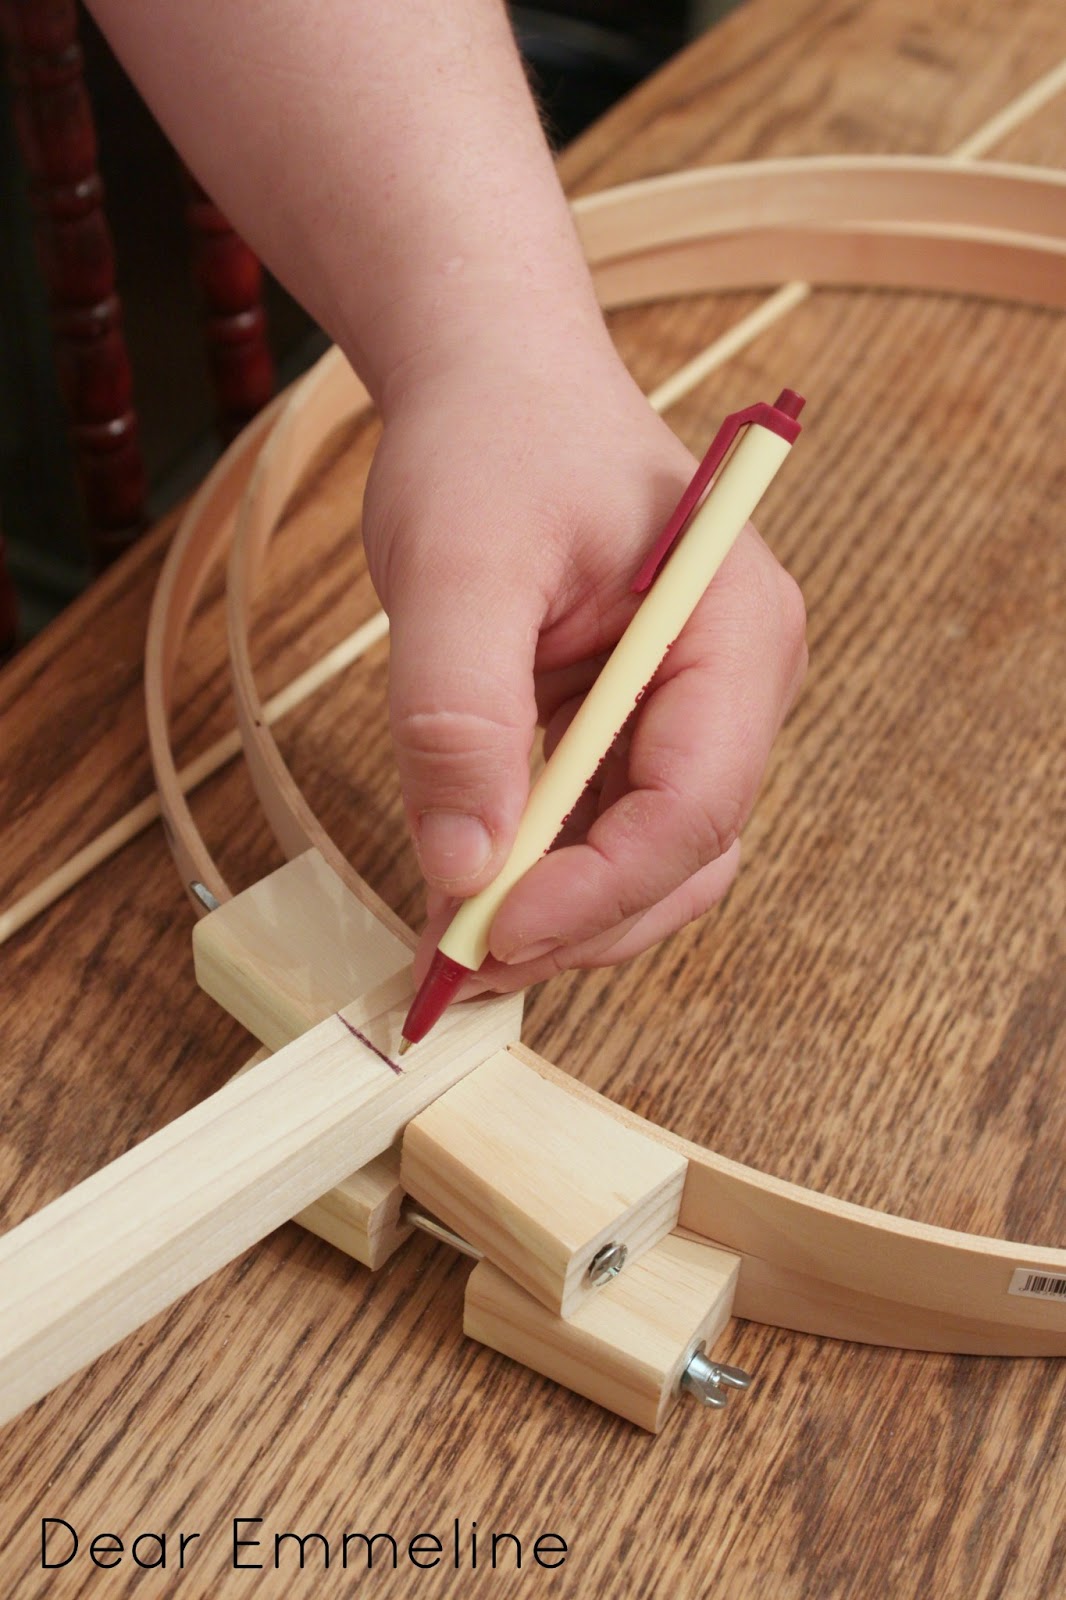

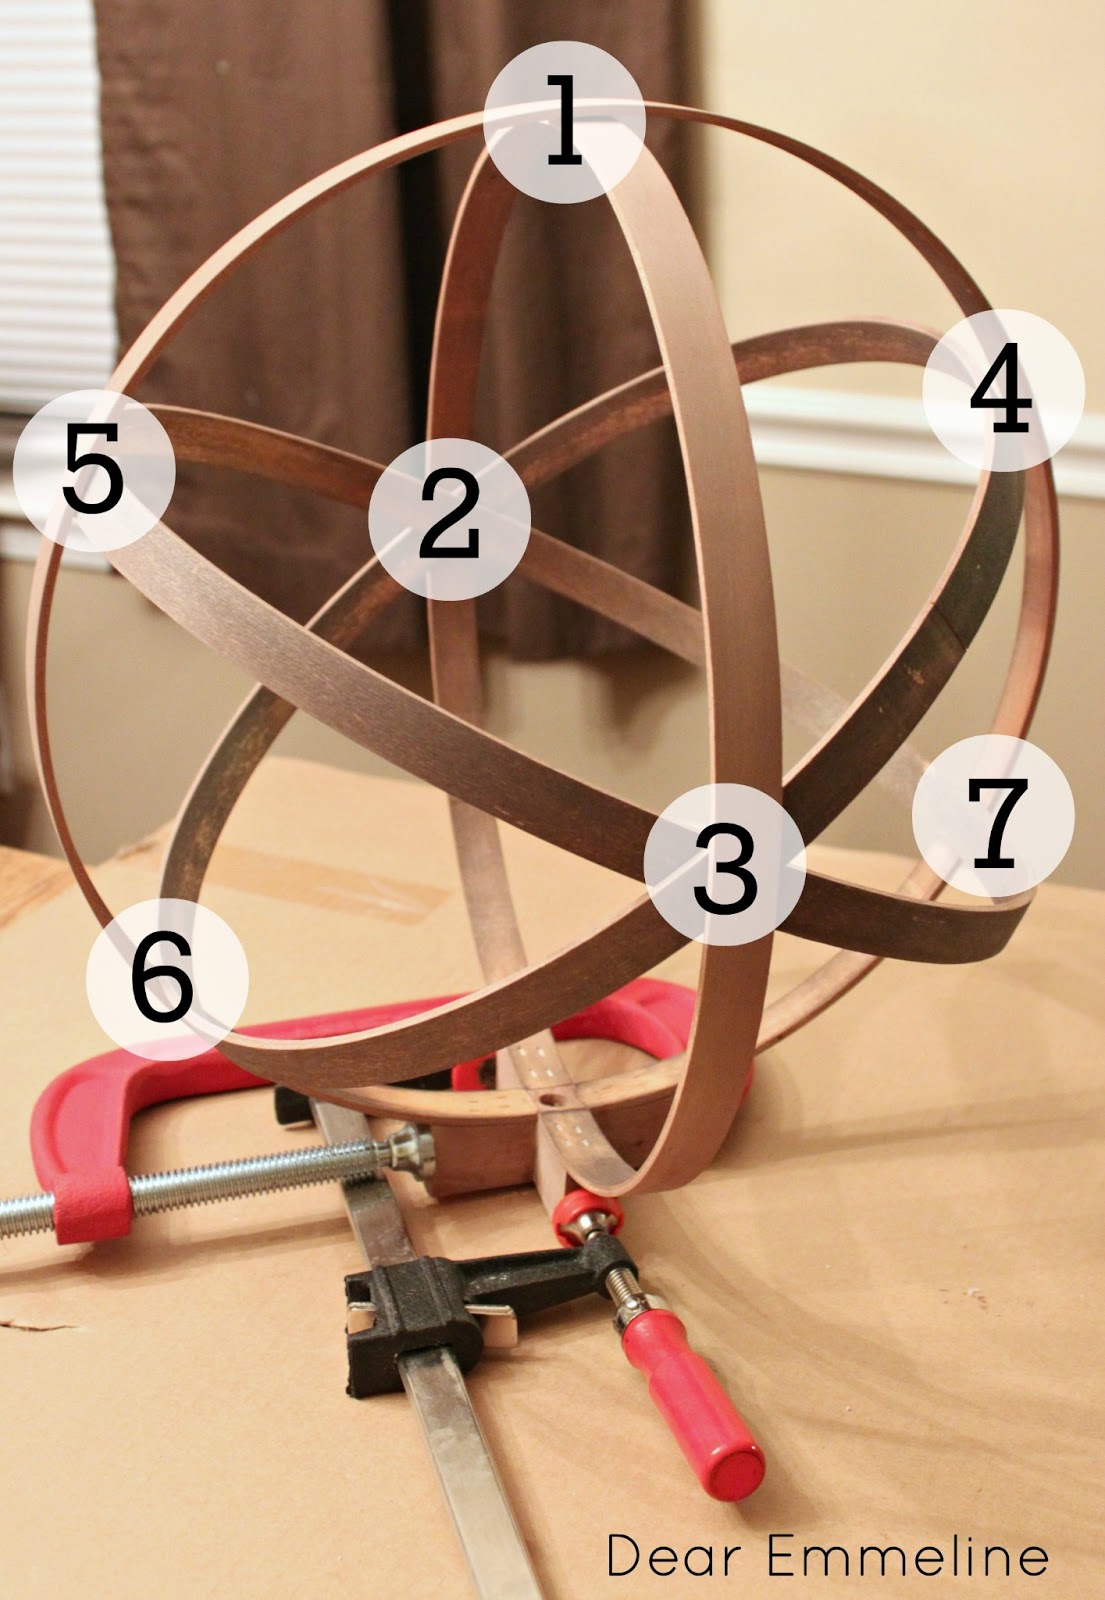
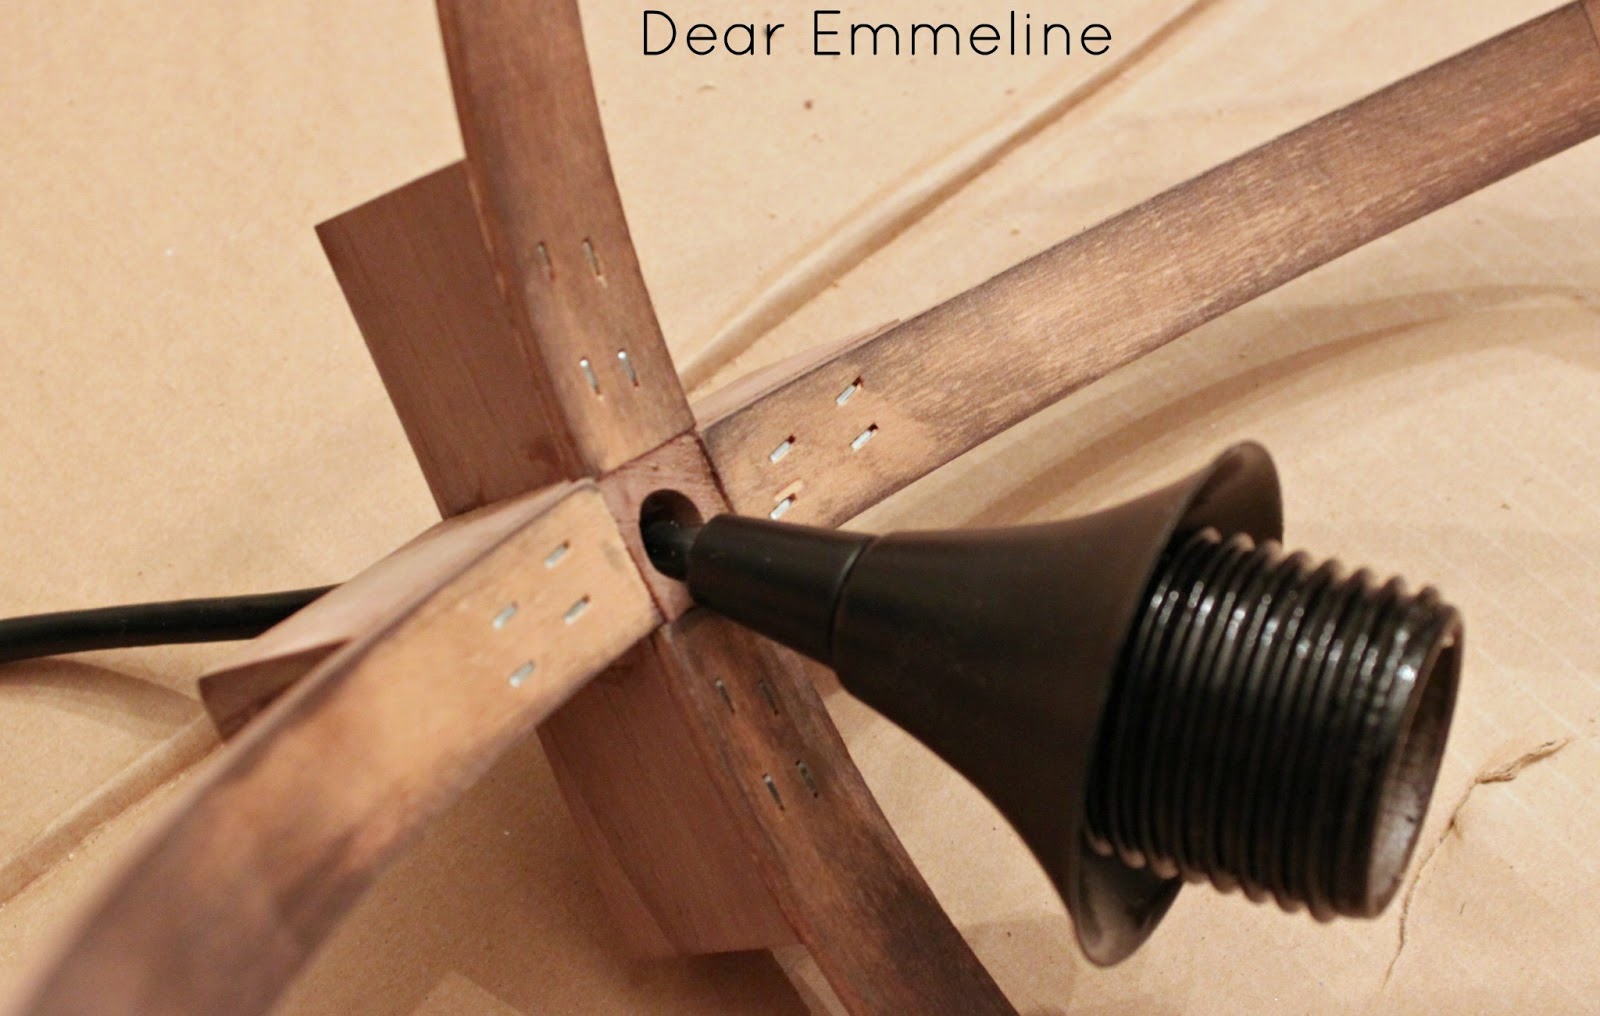
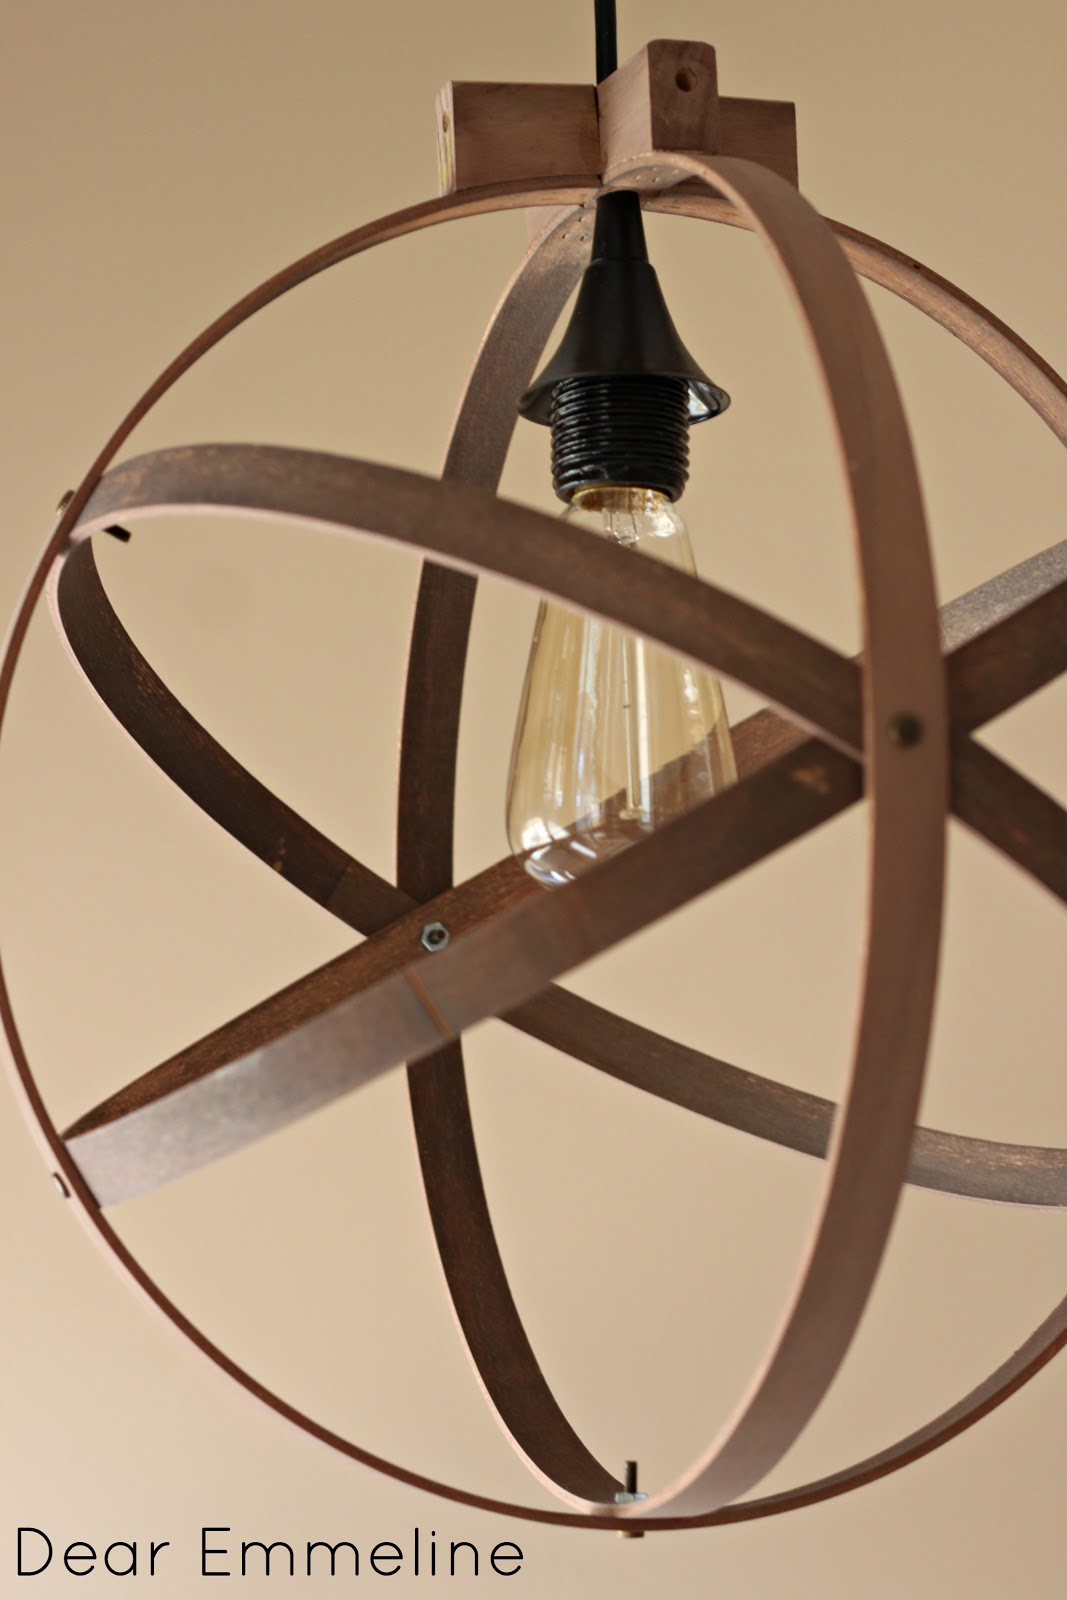
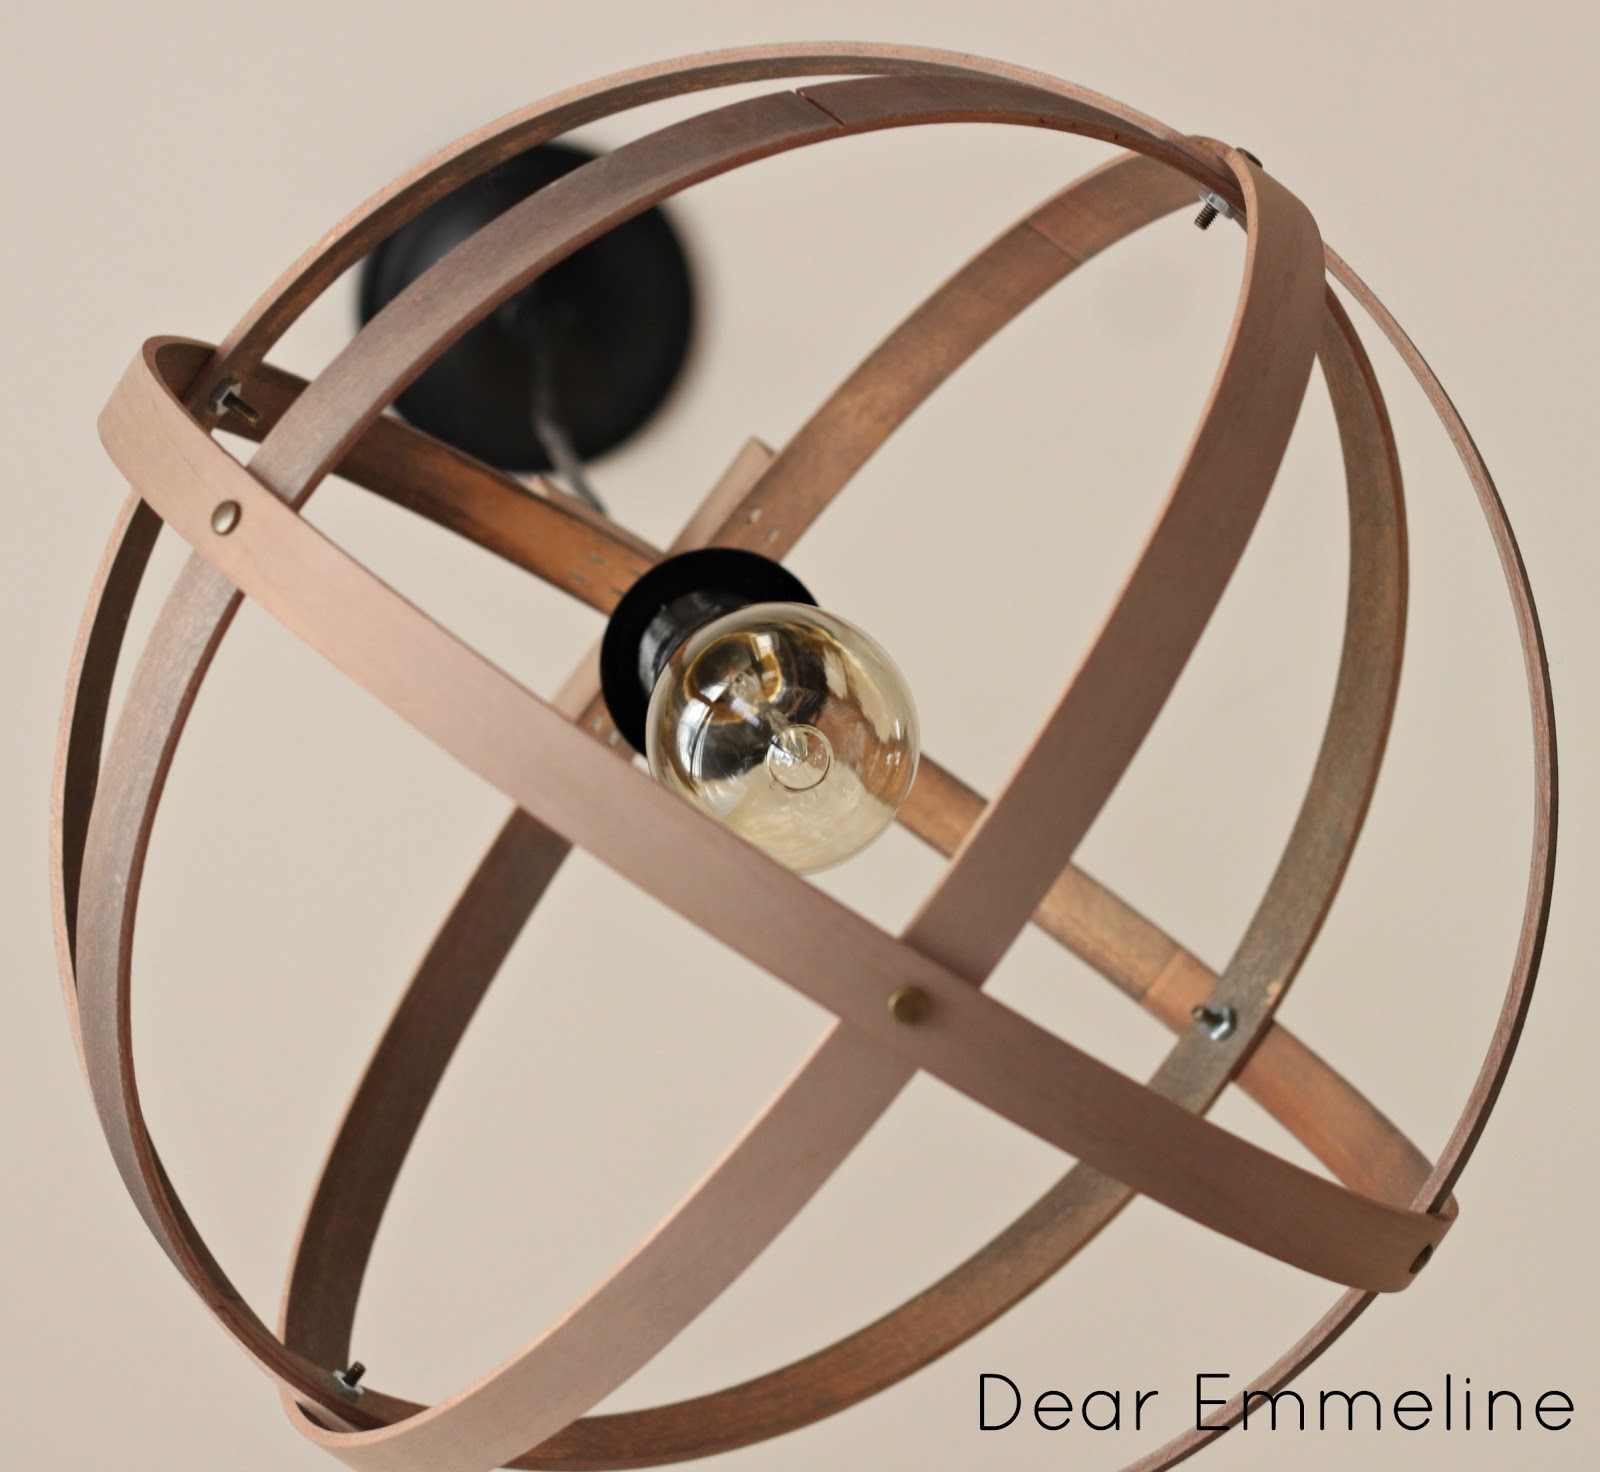
Remove the hoop fasteners and center your 3/4 dowel between the hoop tops. Glue and clamp each hoop to the dowel.

Feed the inner piece of each quilt hoop into the ball overlapping them to make an X shape.
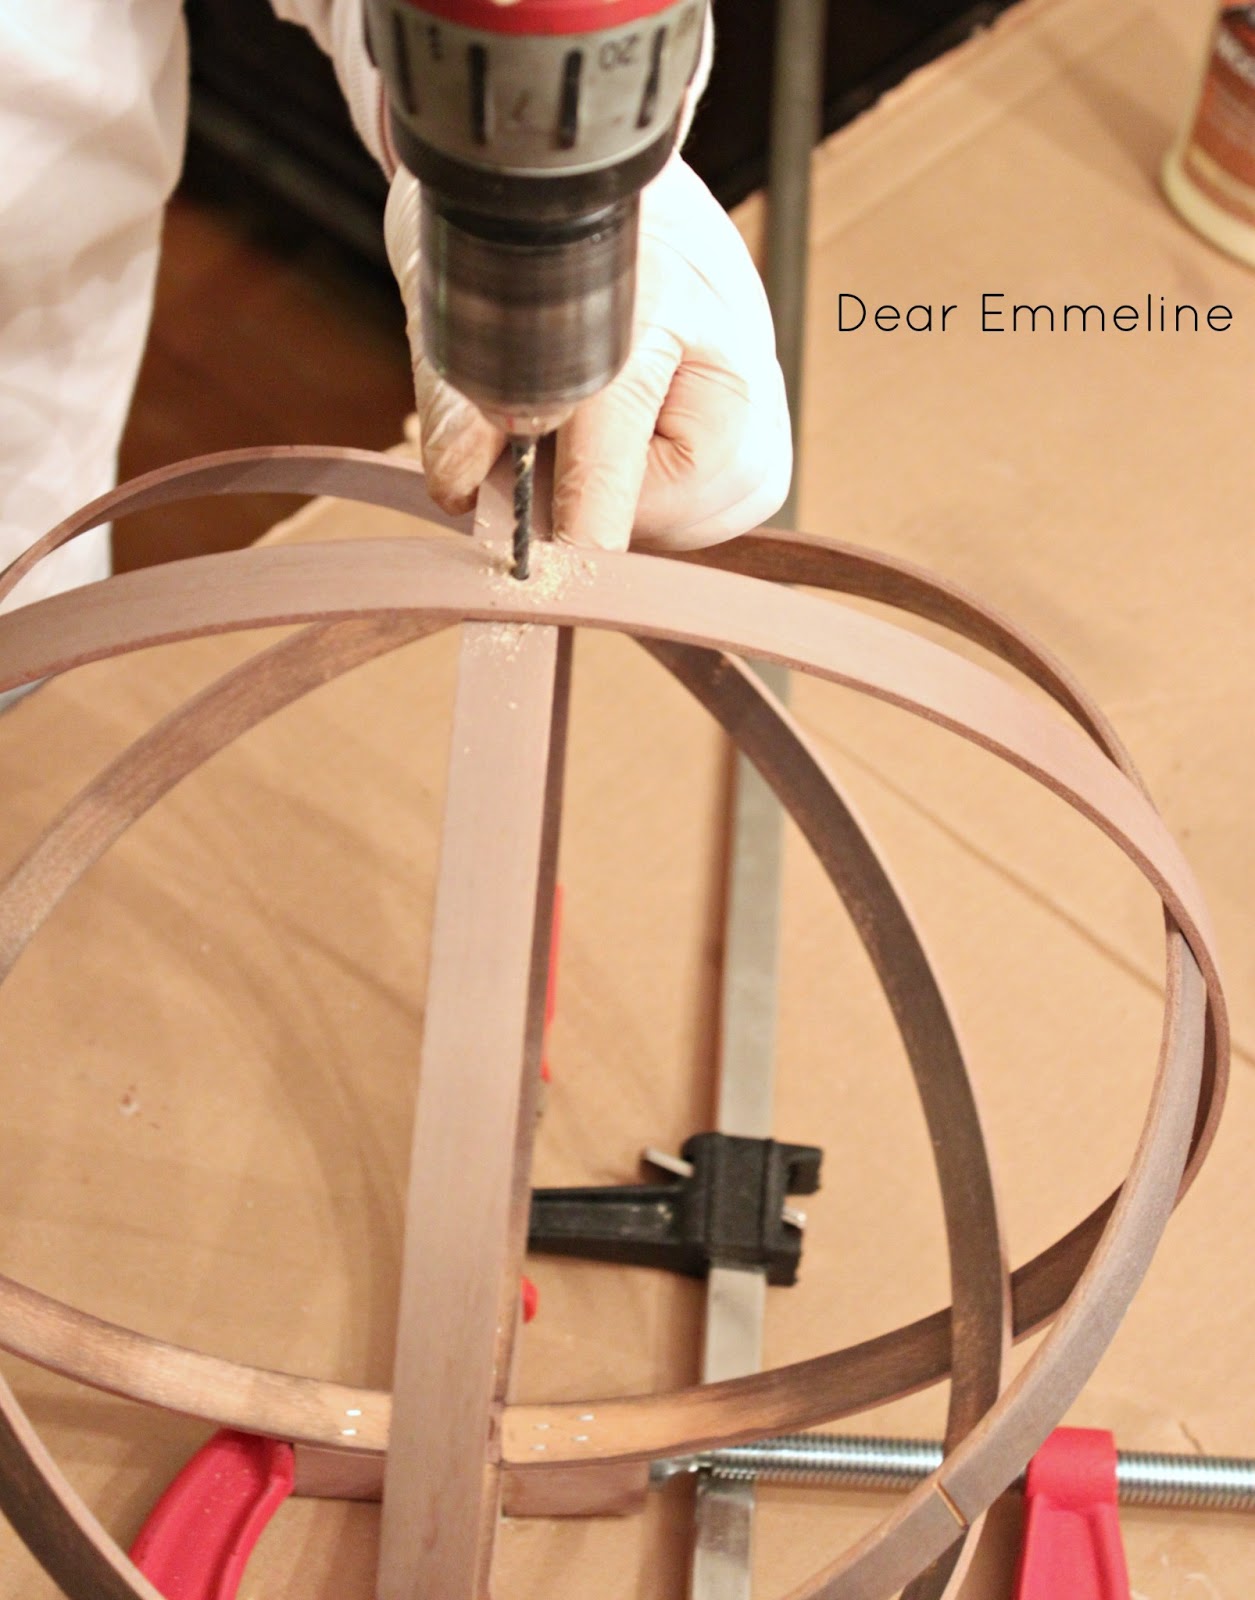
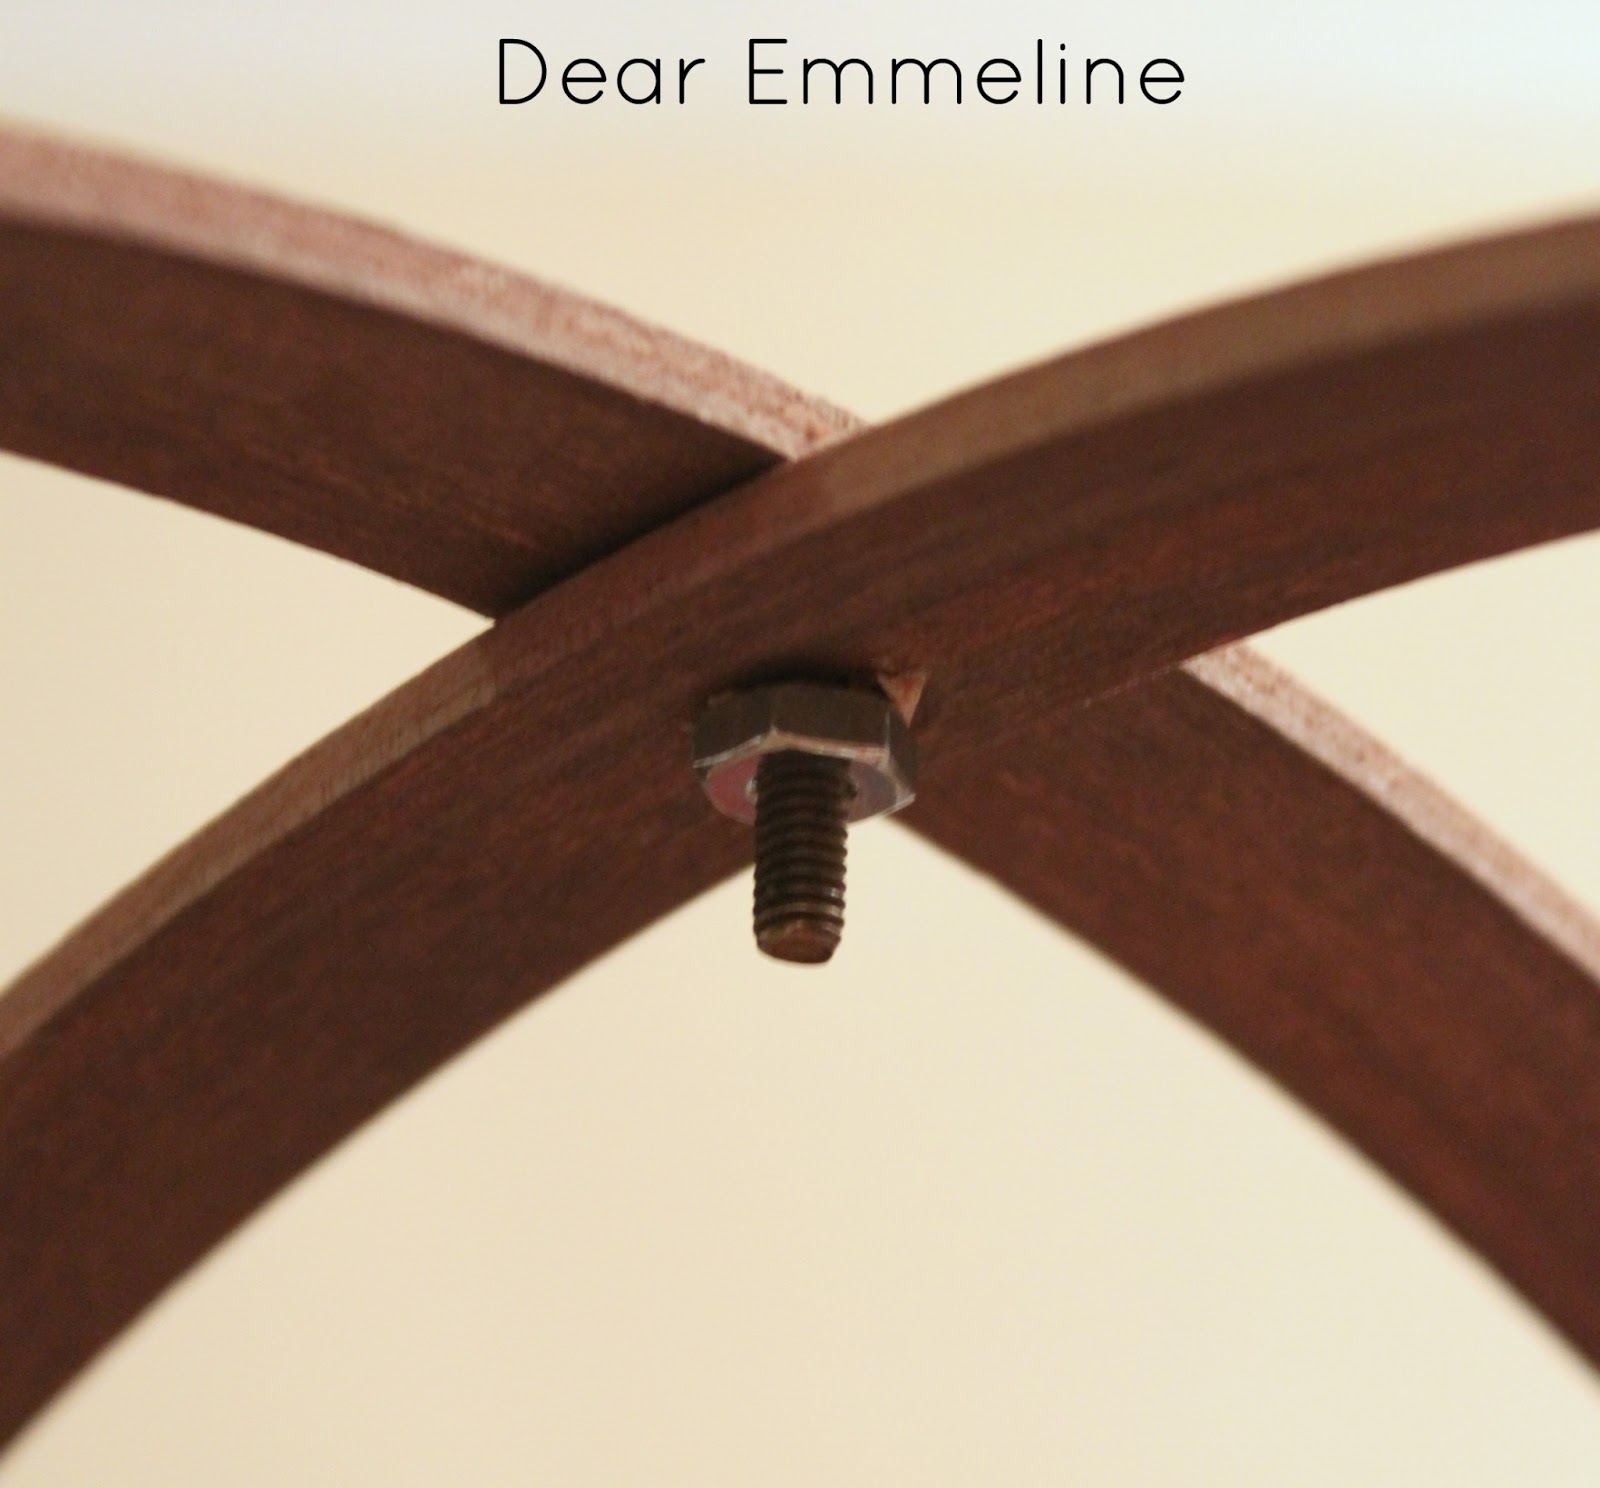
Starting with the bottom, drill through each hoop overlap (there should be 7). Feed the screw through each hoop and fasten with a hex nut.
You could cut down the screws if you want the to end up being flush with the nut but we chose to leave them as is since the piece has an industrial look to it already.
Feed the pendant cord through the 3/4 dowel and you’re ready to hang it up!
LOVE this, jessica! such a great idea and use of inexpensive materials!
Love this! What a great tutorial. I'd love for you to share it at Silver Pennies Sundays! http://www.findingsilverpennies.com/2013/03/silver-pennies-sundays-link-party_10.html
I really like that you used embroidery hoops. It looks amazing and I wouldn't even know that used embroidery hoops if you hadn't posted the steps for making it. Visiting from East Coast Creative…
Jenny @ http://jennylynndesignz.blogspot.com/
I totally love it!
AMAAAAAZING!! I am SO in love with it! You rocked it out, chick! Well done!
Kelly @ View Along the Way
http://www.viewalongtheway.com
Holy cow I just saw this on East Coast Creative and I need one or more of these! I want these in multiple colors in different rooms! I am so excited about this project. Nice job can't wait to make my own.
Looks so good! Love it!!
I absolutely love this idea! Now this is repurposing at its best! Wish I had all the tools necessary to make several of my own. One day I will. I'm posting this to my recycled/repurposed and creative ideas boards on pinterest. http://pinterest.com/patinaparadise/creative-ideas/ This is a winning project :o)
Visiting from ECC.. I'm so in LOVE with this light fixture! I think I need one.. it might just be possible Thanks to your great tutorial! INCREDIBLE creativity! LOVE it!
I. SO. WANT. THIS. Oh my goodness, Jessica!! Your light is beyond amazing! We just replaced all the lights in our house, but I don't care, now I want to make this and replace one of our new ones! It's just so cool! You've really outdone yourself, girl!
You are right…great minds think alike!! 😉
Aimee@TheVintageEstate
Oh, I LOVE it! I actually like it better than the inspiration piece! I'm going to share this on my Facebook page (I don't have a blog yet!). Thanks so much for the instructions, too!
It was so crazy to see such a similar project linked up the same week!
Thanks Jenny! Made for one inexpensive light fixture!
Saw this over at Lil Luna – so fabulous! I love it!! I say something similar in a banana republic store. So cute!
This is fabulous!
Popped over from Lil Luna!
Beyond creative! I would love to put this in my foyer!!!!
Thanks for sharing it at TUTORIALS TIPS AND TIDBITS!
So so so AWESOME! You really rocked this, I love it!
Oh, wow–GREAT idea! I'm so in love with this!
This looks amazing! Great work! 🙂
How clever and creative – I really love this.
What a great idea! It looks fabulous!
WHAT??? No way! That's amazing! Aren't you so clever! I won't even attempt to try this but I LOVE it!
Jamie ~ somuchbetterwithage.com
Emmeline,
Great creative talent, dear one!!!
Visiting from Yvonne's TTT!
Fondly,
Pat
This is awesome! I've been brainstorming DIY pendants and this definitely fits the bill! Thanks for sharing such a great tutorial!
Very nice and I love the industrial look. Out of all the DIY hoop lights I've seen, yours is the best so far. Great job.
Love the lamp! I've been wanting the one that looks like this from Lowe's and Ballard's, but your version is definitely in my budget! 🙂 So creative!!!
This is insanely amazing!! How creative. I have yet to make a pendant but if I did I would want it to look just like yours! I am featuring this in my weekly wow's on Saturday.
omg, were you jumping up and down after you made this! awesome, will replicate!
🙂 Laura @LifeWeLive4
Sooooo cool! Pinning this!
Just saw this at Hometalk. LOVE IT!
Wow, so creative! I thought when I first saw it that the hoops were metal. I never have the guts to attempt to make my own lamp… Seems too complicated. Well done!
{lamourcheznous.wordpress.com}
This is so cool…beyond cool. I can see it in m y living room..my sons room…so many places. GREAT IDEA!
I just pinned this! It look really awesome and it's so creative!
This is fabulous!! Found you through Home Talk and am now a follower!! Great job!
~~Angela
Awesome project and tutorial! I'm visiting from the Simply Designing link party.
Yes Yes Yes!!! Fabulous! I've been wanting a light fixture like this one. Thanks for sharing.
Love this! Just a great idea!
This is so stinkin' awesome! I love it!!
Thanks so much for linking it up at our link party on Friday!
We are featuring it on our blogs tomorrow morning!
Ashley
http://www.simplydesigning.net
Not only are you a rebel, but you are a genius too!
Love this Jess!
Thanks for sharing!
Stacey of Embracing Change
wonderful tute! pinning. little bit
Love this!! I've been looking for a quick and easy way to make a light fixture like this. Thanks for figuring it out! Definitely pinning for later:)
Happy to help! If you make one I'd love to see it!
That is so cute! YOu could probably sell those for a lot of money! Good work!
This is just wonderful! Love the tutorial. Makes me want to try it out!
This is fantastic! I love how you too something so "ordinary" and created something so fantastic! I definitely agree with Nicki above that you could sell these… etsy maybe.
Excellent! I love this so much. Just showed hubby and he was "flabbergasted" lol. Thank you for submitting your innovative-ness over at Looksi! Looking forward to seeing more of your ideas! ~Julie, Looksi Amabassador
Oh I so hope I can do this myself. I think for my tiny, galley kitchen it would be just ideal…. lots of unobstructed light….. wish me luck. First I have to save the money to buy everything. Yes, I am that broke (fixed social security retirement only). Thank you so much for the instructions.
I forgot to tell you that I really like your version so much better than the inspiration one. Although I think both are beautiful and so very clever.
This is genious! I love this idea so much. Where did you get your pendant light kit from? Thanks for entering the Blog Wars competition! and Good luck!
This is so cool. I'm in the process of looking for pendant lights because we're going to update our kitchen… now I'm thinking this would be a better idea! It's so cool and i love the edison bulb inside! -Kristen | A Thrifter in Disguise
Thanks so much Kristen. We have it hanging just inside our front door. I love it and every time I pass by I think…I can't believe we made that.
Hi there, just a question for if I attempt this myself – I can see 4 hoops in the light shade, but in the 'what you need' list you've only listed '2, 14" quilt hoops ' I might be blonde, but I can't figure out what you've made the two internal hoops out of? Are they just embroidery hoops without the connectors? (I don't know anything about embroidery!!) Thanks!
I am wondering the same thing as Jocelyn. I would like to make this, but it looks like you need more than 2 hoops…
Embroidery hoops come as a set. An inner hoop and an outer hoop for sandwiching the fabric being embroidered. When I say 2 hoops I mean a full hoop (inner/outer) which totals 4 pieces. 2 inner hoops and 2 outer hoops. Hope that helps!
I fell in love with this when I saw it on Pinterest yesterday so I got off work today and collected the materials and made it. I am OBSESSED! thank you for helping me find an inexpensive way to switch out our old 1980's dated fixture in our foyer! I don't know how to add a picture or I would share! Thank you for posting this awesome, and easy to follow tutorial!
So glad you like it!!
This is fantastic! I love it and it looks so easy to do. Thanks for sharing your tutorial, I have pinned and would love to do it.
Debbie 🙂
This is genius! I might have to copy your great idea!! 🙂
Anna
askannamoseley.com
Wow, what an awesome light! Thanks for sharing the tutorial 🙂
Thanks Caitlin. Hopefully I'll find a good place for it in our "new" house. If not inside hopefully in the workshop.
Newest follower! Found this light fixture on pinterest and am so excited to make my laundry room pendant light! What makes more sense than one made out of embroidery hoops?! Thank you so much for the wonderful idea and super great tutorial!!
http://shelstringblog.blogspot.com
Can't wait to hear how it turns out!! You'll have to share a picture!
What snow ingenius idea!! Thanks god sharing!!
Hi, I would like to make this light, and I have a question. Can you send the link of the exact quilting hoop you got? I am looking online at JoAnne's, and the 4.99 14" hoop doesnt look like the hoop you used. It doesnt have those chunky rectangular wood pieces. http://www.joann.com/wood-quilt-hoop-14in-3-4in-depth/1046598.html#q=14%22+quilt+hoop&start=1. But the one for 26.99 http://www.joann.com/dritz-no-slip-hoop-14-inch/4802583.html#q=14%22+quilt+hoop&start=3 has those rectangular wood pieces. can you help me out? I dont want to pay over $50 just for the hoops 🙂 Thanks!
I didn't buy mine online. I did a search on Joann.com for you and the hoop I used isn't listed. I would suggest going to the store and seeing what is in stock or searching online via another store. It was a 14" wood quilt hoop for $5.99. I wouldn't spend much more than that since there should be one out there at that price point.
Beautiful work!!!
Thank you!
Hi Emmiline
I just wanted to let you know that following your instructions I've managed to make one of these fabulous light fittings! I had to make one or two changes as my rings came with plastic fittings, so I had to prise them off and make something in wood instead but it turned out OK, and I'm really pleased with it. Having just hung it to see how it looks I've decided to paint it, but once that's done I'll send you a pic. Thanks SO much for saving me an absolute fortune! Total cost £14.00 and the price of a few nuts & bolts! FANTASTIC!
Judi in the UK
Can't wait to see how yours came out! So glad your were able to modify the plan to work with your supplies.
Do you know how I could modify this to use the hoops without the wood blocks/dowel? I am ordering these: https://www.fabric.com/buy/0306594/darice-wooden-embroidery-hoop-14
Not sure how to make the center to attach the pendant light?
Thanks!
It might work to drill some extra holes on one of the hoops near the top of the orb and loop some wire through and around the light fixture. You will need some sort of brace to fish the light through. Depending on the width of your hoops you may also be able to drill a hole directly on a hoop that is big enough for the light cord wires to pass through.
Just wanted to let you know, I made the light fixture using 18″ hoops from Hobby Lobby, but I added Plumbing straps that I sprayed oil rubbed bronze to give it more interest. It is hanging in my breakfast nook and looks amazing. Have gotten many compliments on it. Thanks again for the tutorial. Easy peasy. The hardest part was picking the color of stain I wanted to use. It also cost around $32 to make for a lamp that looks like a million.
Thanks for sharing your experience Ruby! So glad the tutorial was helpful for you. Your version sounds amazing!